How to use SkyDrive for both business and personal data?
Update: Microsoft SkyDrive has been replaced with Microsoft OneDrive. You can learn more about OneDrive here. SkyDrive Pro has been replaced with OneDrive for Business.
Do you have business-related documents on your laptop that you need to share with colleagues, access from various devices and back up properly? Do you, on the same computer, have photographs of friends and family, and other personal documents that you want to backup and easily access from other devices? Many people do!
In order for people to store data securely on the Internet and access it from anywhere, on any device, Microsoft provides an online storage offering called SkyDrive. There is one version called SkyDrive (www.skydrive.com) which is targeted at consumers (for personal use) and one version called SkyDrive Pro (now known as OneDrive for Business) which is targeted for businesses. In a simplistic world, you would use the consumer version, SkyDrive, to synchronize all your photographs and other personal documents that you have on your home-PC and you would use the business version, SkyDrive Pro, to synchronize all your business-related data on your work-pc. However, today, many people mix personal and business data on their computers. In this week’s blog post I’ll share with you how you can use the two versions of SkyDrive for your personal and business data on the same computer.
1. Set up a personal SkyDrive account
If you don’t already have one, sign up for a personal SkyDrive account. A SkyDrive account with 7 Gb of storage is free of charge. If you need more space you can increase the storage amount for an annual fee, 100 Gb costs USD 100/year (see the full price list here). If you have an existing online service with Microsoft such as Hotmail, Live, Xbox or Outlook.com you can use that username and password to register for a SkyDrive account. If not, you can sign up for a new account.
Once you’ve logged in to SkyDrive you will see your files in the SkyDrive web client. From here you can create new folders, upload files, share folders and documents and so on.
2. Download the SkyDrive Desktop App
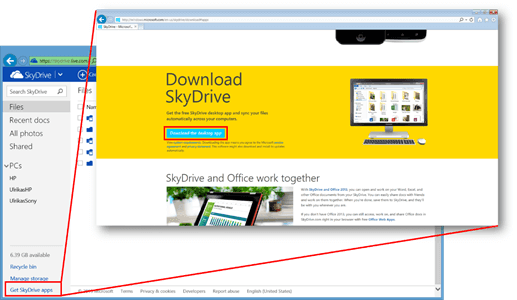
To synchronize your SkyDrive files to your computer, so that you can access them even when you are offline, you can use the SkyDrive Desktop App. In the bottom left corner of your SkyDrive web client, click “Get SkyDrive apps”, a new web page opens up with more SkyDrive alternatives, click on the link named Download SkyDrive.
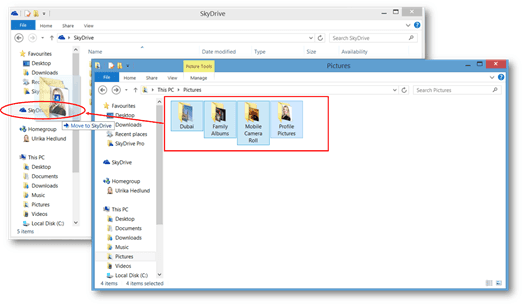
The SkyDrive Desktop App works with Windows Vista (with service pack 2), Windows 7 and 8 (Windows 8.1 has SkyDrive built in, so there is no need to download it). Once you have installed the SkyDrive Desktop App you will see a new SkyDrive folder in the File Explorer and you can copy and save files to your SkyDrive folder just like you are used to with other Windows Folders.
Now you can start moving over personal pictures and documents that you have saved in various folders on your computer to the new SkyDrive folder. The files will be synchronized in the background. Remember though that you only have 7 Gb of space free or charge – which fills up rather quickly.
If you are using Windows 8, you should use this personal SkyDrive account as the Microsoft Account you use for Windows. (If you need guidance on how to change Microsoft Account in Windows 8 please refer to this article).
There is also a SkyDrive Windows 8 app that you can download free of charge from the Windows Store. This is a good option if you have a touchscreen device and you want to be able to navigate your SkyDrive documents using your fingers. The functionality is not as rich as the web interface on SkyDrive.com, for instance, you can’t share documents from the SkyDrive App.
3. Set up a business SkyDrive Pro account
Now that you have your personal SkyDrive account in order, it’s time for the business version of SkyDrive – SkyDrive Pro. SkyDrive Pro is available as an integrated part of SharePoint 2013. Ask your IT department if you have access to SkyDrive Pro within your organization. If you are in charge of your business IT infrastructure and you want to get SkyDrive Pro, you should consider the many alternatives where SkyDrive Pro is included – Office 365 (Small Business Premium, Midsize Business or Enterprise), SharePoint Online or SharePoint Server 2013.
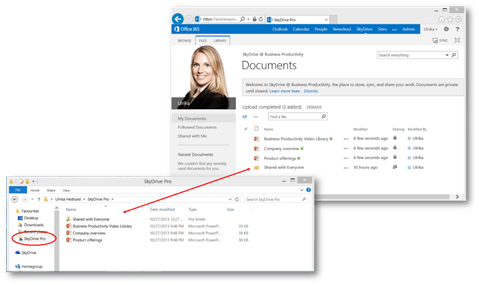
To access SkyDrive Pro, login to your SharePoint site and go to “SkyDrive”. You can easily drag and drop folders to your SkyDrive Pro folder.
4. Download the SkyDrive Pro application
Click “Sync” in the top right corner to synchronize your SkyDrive Pro documents to your computer. The first time you do this a SkyDrive Pro Desktop application will install on your computer. A SkyDrive Pro folder called “SkyDrive @ Your company name” will appear in your folder list. Here you can see if your files are up to date by looking at the little green icon next to the file names.
To start, stop or pause synchronization and to check the status of the synchronization status right-click the SkyDrive Pro icon in the notification bar and select one of the options there.
(If you are using Microsoft Office 2013, and you mostly use it for business documents, you can set the account you use for SkyDrive Pro as the default Microsoft Office account.)
Be smart when it comes to dealing with personal data
If you are provided a laptop and mobile phone by your employer then the physical hardware, as well as everything that is stored on it, belongs to your employer. Ideally, you shouldn’t have or do anything of personal nature using those devices. But we all know that doesn’t work in real life, so you need to be smart about how you take care of your data. You want to make sure that you can still access all your personal email and photos if your employer suddenly takes the devices back. Using SkyDrive to store all your personal data is a great solution since you have all your data available on the Internet, you can still access all of that data as long as you have your username and password. I strongly recommend that you use a separate email account for all personal communication and that you have an organized way to save your photographs and personal files. Don’t risk the chance of losing personal data that means a lot to you and don’t be sloppy when it comes to personal, sensitive data that shouldn’t end up in your employer’s hands. Be smart when it comes to storing your data!
(If you have difficulties reading this article, you can access the full article in pdf here).


