Use media to add life to your presentations
Introduction (00:04)
No matter what type of presentation you’re delivering inserting videos into your slides help add life and movement into your presentation. Today it’s really easy to create your own video using your mobile phone or digital camera or you can browse the internet to find a video that’s suitable to reemphasize the message of your presentation. PowerPoint 2013 has a number of good video editing tools that can help you work with your videos. Let me show you how they work.
Adding music to your presentation (00:35)
Here I have a presentation that I want to make into a video ad and upload to our YouTube channel. I ‘m going to add audio and videos to the presentation so that it comes more alive.
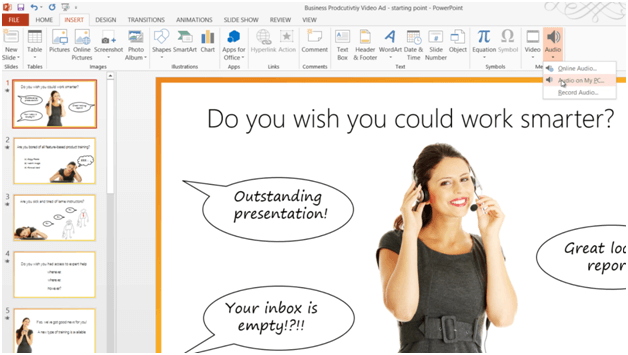
First I want to add some nice background music. To add background music to your presentation mark the slide where you want the music to start. I already have the first slide marked. Click “INSERT”, “Audio” and then select from where you want to insert the audio file. I’ll select “Audio on My PC”
and select a melody that I have purchased and downloaded from the Internet and click “Insert”. On the “AUDIO TOOLS” “PLAYBACK” tab I’ll check the option to “Play Across Slides”. I’ll also mark the option to “Loop until Stopped”. This way the song will repeat until the presentation ends. I’ll click the “Volume” tab and change the volume to “Medium”. I’ll mark the option to “Hide During Show” so that the audio file isn’t visible and then in the “Start” drop down I’ll select “Automatically” since I want the music to start playing when I start the slideshow.
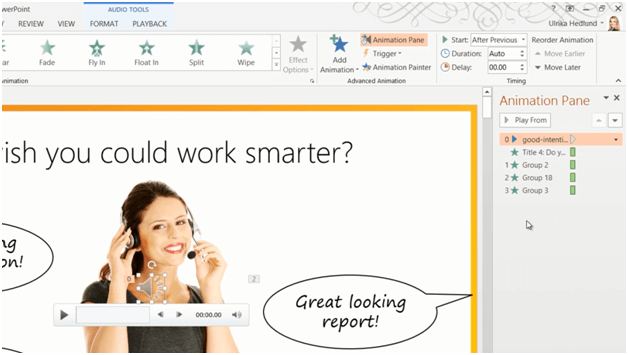
I’ll click the “ANIMATIONS” tab and then open up the “Animation Pane”. Here I can see that the music has been placed last in the animation list, so I’ll just drag it to the top to make sure it starts right away.
There now let’s check this out in SlideShow mode. Perfect!
Inserting a video into your presentation (02:05)
I’ll close down the “Animation Pane” and l go to the slide where I want to add a video. To insert a video go to the “INSERT” tab and click “Video”. I’ll select “Video on My PC” and select the video I want to insert.
To resize the video I’ll just grab one of the corners and move it to keep the proportions of the video. I’ll position the video where I want it in the slide and the alignment guides help me to find the center of the slide.
Then I click play. The video has our jingle and then a title slide before I start speaking which I want to remove, in other words I want to trim the video.
Trimming your video (02:45)
To trim a video, have the video marked and click The “PLAYBACK” tab, and then “Trim Video”.
Here you will see a green and a red handle bar. Move the green handle bar to where you want the video to begin. Here I’ll move the green bar to when I begin speaking and I’ll move the red to where I want the video to end. To make sure the ending sounds ok I’ll click right before the red bar and click play. I can fine-tune the timing by using the up and down arrows. There that sounds good! So I’ll click Ok.
Formatting your video (03:28)
Now I want to make some changes to the formatting of the video. If you go to the “FORMAT” tab you have numerous options to format your video. You can make corrections to the brightness and contrast of the video itself, you can also change the color – perhaps you want the video to be black and white.
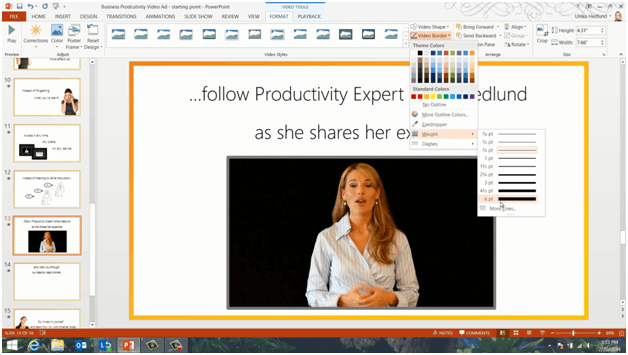
I want to keep the video as it is, but I want to add a frame to the video so that it looks like it’s playing on a LCD screen. There is a full gallery of designs to choose from, however you need to be careful here because some of the frames make modifications to the video. As you can see if I apply this one the video becomes a bit lighter. To avoid that I’ll just add a normal border by clicking “Video Border” and selecting a grey color for the border. I’ll click “Video Border” again and increase the weight of the line.
Then I’ll click “Video Effects”, “Shadow” and select an “Outer Shadow”. There now I’ve made the changes without affecting the actual video.
Setting playback options (04:32)
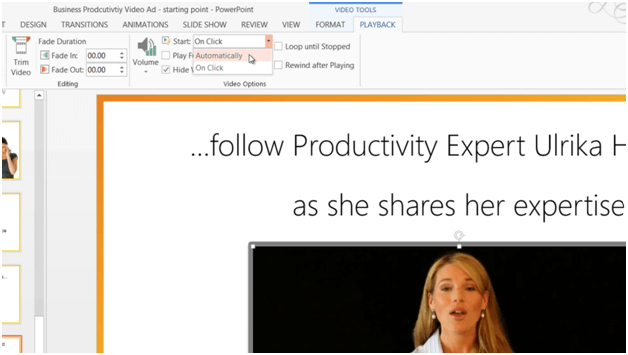
Now I need to decide how this video should be played. I’ll go to the “PLAYBACK” tab. I don’t want the video to show until it starts playing so I’ll mark the option to “Hide While Not Playing”. In the “Start” drop down I’ll select “Automatically”.
I’ll click the “ANIMATIONS” tab and open up the “Animation Pane” to see the order of the animations.
The video will play automatically after the text appears, which is the way I want it. Let me see what this looks like in SlideShow mode. Perfect!
Changing the video image (05:08)
I’ll close down the “Animation Pane” and go to the next slide where I want to insert one more video. I’ll click “INSERT”, “Video” and select “Video on My PC” and insert my second video. I want this video to have the same size and the same position as the video on the previous slide.
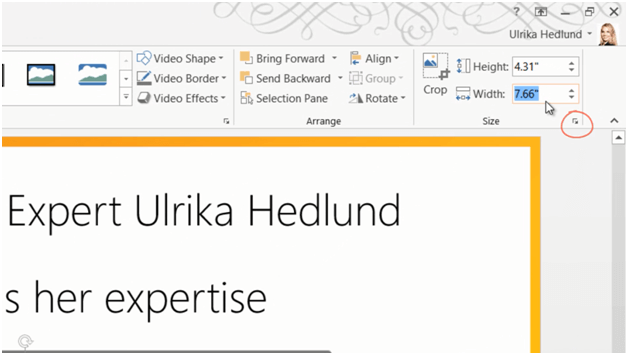
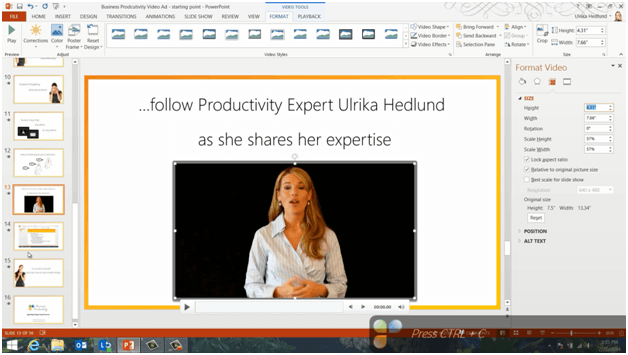
I’ll go back to the first video I inserted to see the size. To open up the Format Video property pane I’ll click the little arrow in the “Size” section.
Here I’ll copy the height of the video by pressing “CTRL C” then I go back to my second video, open up the size properties and paste in the same height by pressing “CTRL V”.
Now I’ll go back to the first video again and open the properties for the position. Again I’ll copy over the properties of the positioning from the first video to the second video. There! Now they are in the exact same place. I also want the video to have the same formatting with the frame and the shadow. I’ll go back to the previous slide, mark the video and on the “HOME” tab I’ll click “Format Painter”. I’ll go back to my second video and mark it. There! Now I just have to do something about this video image. I’ll go to the “FORMAT” tab and click “Poster Frame”.
Here you can select to take a still image from somewhere else in the video or insert “Image from File”. I’ll click “Browse” and select the image I want. There now my image is applied to the video. Now I need to modify the playback options. I’ll go to the “PLAYBACK” tab and select to Start Automatically.
Using bookmarks (06:57)
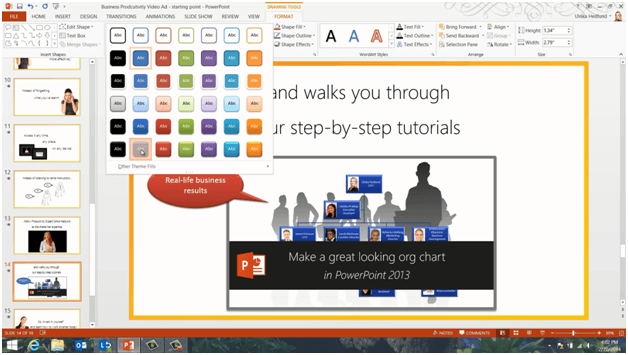
About 17 seconds into the video I want to add a speech bubble with text highlighting that our videos showcase real-life business results. To insert a speech bubble I’ll click “INSERT” “Shapes” and then select a callout speech bubble. I’ll draw the speech bubble and then move the pointer. I’ll right-click and select to ”Edit text”. I’ll add the text “Real-life business results” and apply a nice design.
In order for the speech bubble to appear at the right time I need to add bookmarks to my video. To add bookmarks to your video, mark the video and go to the “PLAYBACK” tab.
I’ll go to the part of the video where I want the speech bubble to appear and click “Play” and then “Add Bookmark”.
I’ll click “Play” again and then I’ll add the second bookmark when I want the speech bubble to disappear. Now I can apply the animations to my speech bubble. I’ll mark the speech bubble and click the “ANIMATIONS” tab.
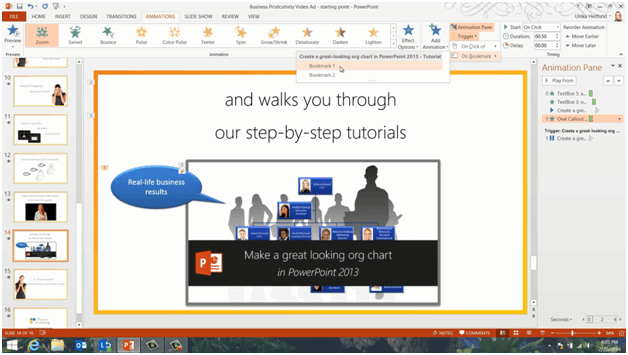
I’ll open up the “Animation Pane” to see the order of the animations. I’ll click “Add Animation” and apply a “Zoom” entrance animation. I’ll click the “Trigger” button and select “On Bookmark” and then “Bookmark 1”.
I’ll click “Add Animation” again and select a “Fade” exit animation. I’ll click “Trigger” “On Bookmark” and “Bookmark 2”.
Now let’s see what this looks like. I’ll fast forward to the point in the video where the bookmarks are, and there is my speech bubble and then it fades away. Great!
Saving the presentation as a video (08:39)
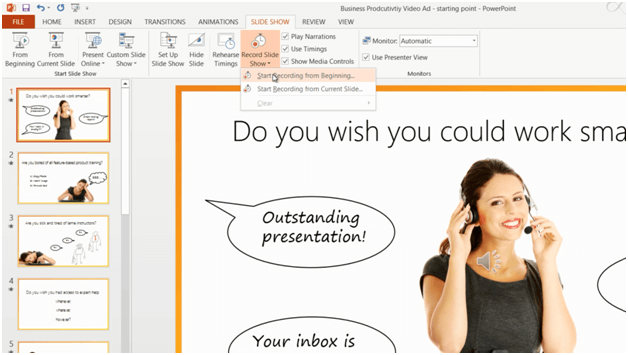
Now for the final step. I’ll close down the “Animation Pane” and go back to the beginning of my presentation. To make a video from this presentation I first need to record the timings of the animations. I’ll go to the “SLIDE SHOW” tab, and click “Record Slide Show” “Start Recording from Beginning”.
I’ll deselect the option to record “Narration and laser pointer” and then I’ll click “Start Recording”. Now PowerPoint tracks when in time I press to move forward in the presentation. When I’ve walked through the entire presentation I’ll click “Yes” to save the recorded timings. I’ll save the presentation then go to the “FILE” tab, click” Export” and then “Create a Video”. I’ll keep the default quality which is for high definition displays. I’ll also choose to use my recorded timings. Now I’ll click “Create Video”.
I’ll save the movie into my videos folder and click “Save”. Now it’s being exported into an MPEG-4 video file that I can later upload to our YouTube channel.
To insert a video from YouTube in your presentation click “INSERT,” “Video” and then “Online Video”. In the YouTube search box type in the name for the video you want to insert.
I’ll write “Introducing Business Productivity”. Here I have our company video that I can easily insert into my slide and then I’ll just resize the video player a little bit. When you insert videos from YouTube you don’t have as many options in the playback tab as you do when you insert videos that you have on your PC. To play the video I’ll start the slideshow and press the video clip.


