Take control of your inbox
Learn how to manage your email effectively using Outlook 2010
Introduction (00:02)
Welcome to Business Productivity, I’m Ulrika Hedlund. When it comes to managing email, there are as many ways to do it as there are people with an email address. Everyone has their own way of managing their inbox. There is no right or wrong way to do it, but there are a number of guidelines you can follow in order to manage your inbox a lot more effectively. In this video I will share with you some of the advice that I follow and some of the steps that I’ve taken in order to take control of my inbox.
In the first part of this video I’ll show you what an organized inbox can look like. In the second part I’ll show you how to configure Outlook 2010 in order to minimize distractions, and in the third and final part of the video I’ll show you how to automate some of the steps in order to save time. Let me show you!
Having no system causes stress (00:55)
Many customers I meet are frustrated when it comes to email management. They have no good system and they feel overwhelmed with the amounts of email that they have and that they have to follow up on. Many times they have lots and lots of folders that they try to organize their email in. They flag emails for follow up, but they just end up with a very, very long to do list. They don’t know how to prioritize and this makes them stressed.
How I manage my email (01:22)
I’d like to share with you the system that I’ve used for a couple of years to manage my email. And even though this might not suit you, hopefully you can get some points and some tips for how to manage your email more effectively.
Instead of using a number of different folders to organize my email I just have three; “Action”, “Read” and “Archive”. The “Action” folder contains emails that I need to action. These are then categorized: the ones that are urgent that I need to follow up on right away; the ones that I need to follow up on, but that I can schedule at a later date; and email that I need to follow up on, but I’m waiting for input from someone else before I can action it.
The “Read” folder contains emails that I want to spend some more time on and read, but they don’t require me to action. And finally I have the “Archive” folder. This is where I put everything that I don’t want to delete, and by nature I save a lot of email just to keep a log on everything. I organize this folder by conversation. This way I can get a good overview of emails that are part of the same conversation. Instead of dragging and dropping email to the different folders I use “Quick Steps”.
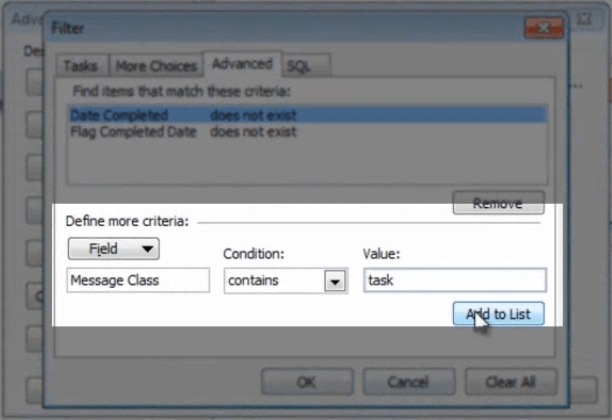
This way I can quickly organize the email, empty my inbox and have a good overview of what I need to action. Now the default view for Outlook is to show you all of your flagged email in your to do list. I don’t like to see them here because it gets too cluttered. Here I only want to see my tasks. So I put a filter here, only to show the tasks that I’ve created.
Part 2 – Configure Outlook 2010 to minimize distractions
Remove email notifications (00:00)
Most productivity experts agree that you should schedule time during your day for email. So I schedule an hour in the morning, if I don’t have any other meetings, half an hour after lunch and then an hour in the evening. Now I know that most people are very curious by nature and they keep going back checking their inbox, but this really distracts you from the work that you’re doing. So one thing that you can do, in order not to be as distracted is to remove all of the notifications. To do that, go to the “File” tab, go to “Options”, click “Mail” and then scroll down to the “Message arrival” section. Here I’ll just uncheck all of these boxes in order not to get notified. And then click “OK”.
Configure the Search Tools (00:45)
Now let’s switch over to our mailbox. Working with your mail has become so much easier now that you have powerful search tools. To configure the search tools, just click in the search box and you will see the search menu up here:
By default Outlook searches the current folder. I like to have it this way because usually I know in which folder I want to search. But if I want to include all of my archives and all of my other accounts as well; I can just choose “All Subfolders” or “All Outlook Items”. If you want to change this you can go to “Search Tools” and then “Search Options”.
Here I can see the Outlook stores that are being indexed by Windows Search. I can also change the setting of the search results. Here I can include results from the current folder or all folders. Again, I recommend that you start with the current folder because you can always expand the search after if you don’t find what you are looking for. I can also choose what color I want my highlighted search results to be in. I’ll just keep the default here, which is yellow. Okay.
I can also choose which accounts and data files I want to include in my search results. So here I’m going to include my private account, my business account, my SharePoint lists and also an archive that I have locally only on this machine.
Create folders to organize your email (02:02)
Now I’m going to create some new folders to organize my email. The first folder I’m going to create I’ll name “.Action”. This is where I’m going to put all the emails that I need to follow up on. As you can see, I’m using a period in front of the name. This is because I want it always to be on top. Next I’ll create one called “.Read” and then finally I’ll create one called “.Archive”. Outlook organizes the folders alphabetically, so now I get them in the order that I want them when I use the period signs.
Create categories to sort your action list (02:35)
Next I’m going to create three categories for my “Action” folder. By default you will already have a number of categories but these will just be named by the color. So we’ll use these, but we’ll just rename them. So first I’ll go to “All Categories”,
I’ll take the red category and I will rename it to “Urgent”. Then I’ll rename the orange category to “When possible” and then finally the blue category “When response arrives”. And I’ll click “OK”.
Now instead of manually setting the category for each email and moving it to the appropriate folder I’m going to use the “Quick Steps” in Outlook 2010 in order to do this automatically for me.
Part 3 – Automate filing using “Quick Steps”
Create Quick Qteps to automate your filing (00:00)
To manage the Quick Steps you can just click on the little arrow.
When you install Outlook you already have a number of Quick Steps configured for you. But we’re going to take these, and we’re going to delete some of them and we’re going to change some of them.
The first one, the “Move to” we will just edit [click “Edit”], and we’ll call this “Archive”. We’ll choose to move the emails to the archive folder that we’ve created. We’ll mark it as red. We’ll also choose to clear all categories [Clear Categories] and clear all flags [Clear flags on message]. Here I can also choose a shortcut key for this action. And I’ll just choose the first one.
Click “Save”.
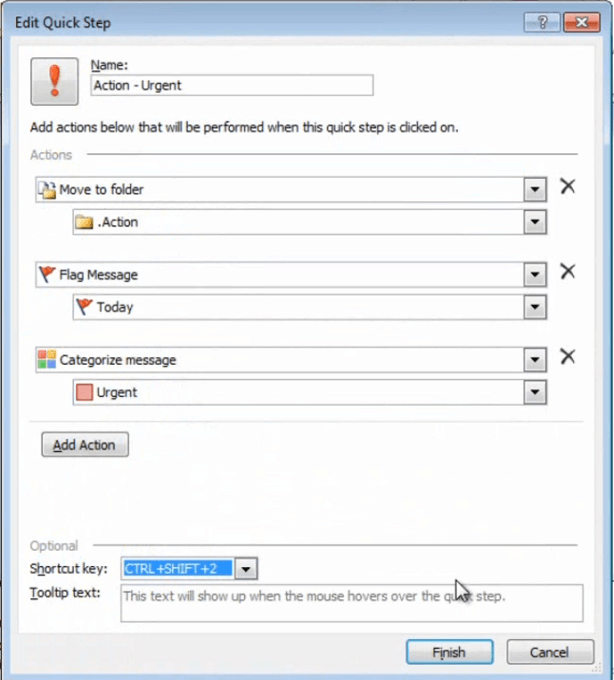
Now, instead of just editing the others I’ll just delete them and create a new custom quick step [click “New” then “Custom”] that we’ll call “Action – Urgent”. I’ll select another icon for this, and since it’s urgent, I’ll use the exclamation mark. So here we want to move it to the action folder. We want to put a flag on it, today [click “Add Action”, then “Flag Message”, then “Today”]. We also want to put a category, which is “Urgent” and we’ll also choose a shortcut. Ok.
And then we’ll do one more. Which we’ll call “Action – When possible”. Here I’ll put a flag as the icon. We’ll move it to the action folder. We’ll add a flag. This week. We’ll put a category, which is “When possible” and we’ll put a shortcut.
And we’ll do one more. “Action – Waiting for response”. We’ll put the information [as an icon]. Again, we’ll move it to the action folder. We’ll flag the message, but we won’t put a date. We’ll choose a category, which is “When response arrives”. And we’ll create a shortcut for this.
Now we’ll just create two more and then we’re done. I’ll name this one “Read” and I’ll choose an icon with books. I’ll choose an action move it to the folder “.Read”. And give it a shortcut. If I try to give it a shortcut that I’ve already used Outlook gives me a warning message.
So here I can put another one. Ideally you would see it in this view but you don’t so you just have to remember which shortcut keys you’ve put.
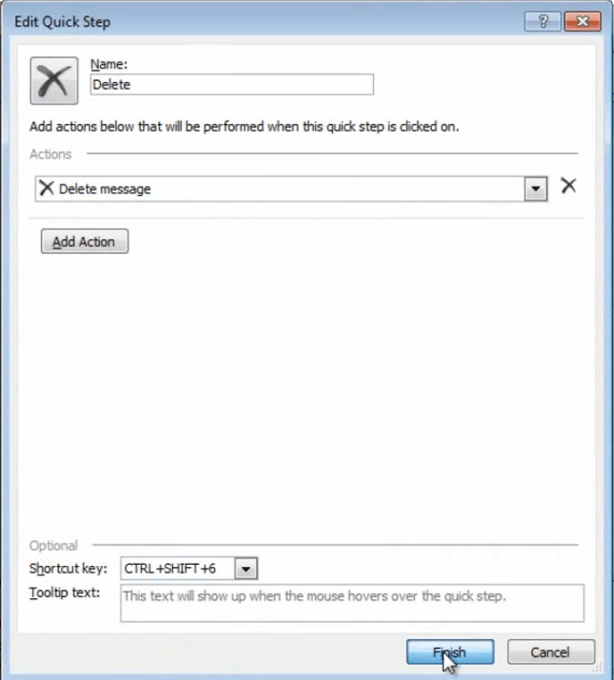
And then finally, the most important one, which is “Delete”. This you should use a lot.
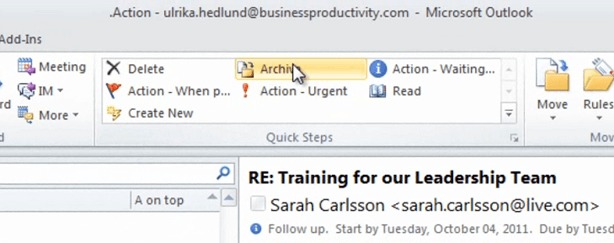
Okay, we are done with our Quick Steps, but before I close this down I just want to re-order the Quick Steps. So I want to put the ones I use more often at the top. So “Delete” and “Archive” [at the top], and then the “Read” one I’ll just put further down. “OK”.
Organize your inbox using Quick Steps (03:34)
Now you can see that I have “Delete” and “Archive” which are the ones that I use most often next to each other. So it will be very quick for me to just go back and forth between these. Okay. So what I’ll do now is that I’ll go through my inbox and I’ll use the Quick Steps that we’ve created.
A good recommendation is to respond directly to any email that would take two minutes or less. Here I have an email from Rebecka, my Marketing Director, regarding an updated press release. She’s telling me that I’ll get an email from Lisa and that I have to select one of the preferred titles. So this email requires me to action, however I can’t do it right away. So I’ll just click “Action – Waiting for response”.
Here I have an email from Peter and he’s asking me to create an updated company overview strategy presentation, and this is due by Tuesday next week, so I’ll just click “Action – When possible”.
Next I have an email from a potential customer and she needs a quote A.S.A.P. so this one I need to action urgently [click “Action – Urgent”].
And then I’ll just go through my inbox and I’ll use the Quick Steps to just decide whether I’m going to read it, archive it or action it. If you use the Quick Steps you should rather quickly be able to empty your inbox. When you’ve done that, you should go to your action folder.
Schedule time to action tasks from your emails (04:44)
This one:
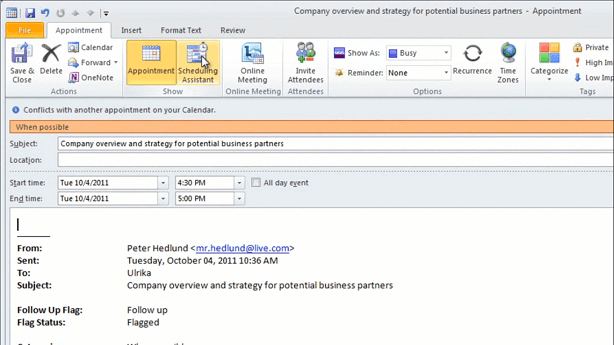
I recommend that you group by category. This way you will sort them by urgency. The email that I won’t be able to follow up on during this hour I’ll make sure to schedule. So to do that I’ll just take the email and I’ll pull it into my calendar. To schedule this I’ll just click the “Scheduling Assistant”.
And I see that I have time tomorrow morning at 9:00, so I’ll just click [at] 9:00, and then I’ll probably need an hour for this. And then click “Save and Close”.
After you’ve organized your email it’s important that you focus your attention to the emails that are in the action folder. These are the most important and urgent emails.
Always show the Action folder when you start Outlook (05:22)
One thing that you can do, if you feel comfortable with it, is to always open this folder when you open Outlook. To do that, you go to the “File” tab, [click] “Options”, [click] “Advanced” and choose to start Outlook from your action folder.
And then click “OK”. Now you can make sure that you don’t miss any important email and that you prioritize and deal with the most urgent email first. When you’re done, you just click “Archive”
And the flags and the categories are cleared.
Filter your To Do List to only show Tasks (05:53)
The final thing I’d like to show you is how you put a filter on your to do list. I only want to show the tasks that I’ve created that are not associated with an email. So to do that I’ll just right-click and select “View Settings”.
I’ll click “Filter” and go to the “Advanced” tab. And here I’ll put “Message Class contains task”. [Click] “Add to list” and then click “OK”.
This way I won’t see the email follow ups, I’ll only see the tasks that I’ve created.
Closing (06:28)
It’s really important that you find a system that works for you. It doesn’t matter which method you use, as long as you’re disciplined and you stick to it. After a couple of days it will become a habit and you’ll notice how much time you can save every day. If you want to know more about different methods for email management you can read my blog, here I have links to a number of different resources. I really hope that you’ll find a way to take control of your inbox. I’m Ulrika Hedlund for Business Productivity – Thanks for watching!


