
Stay on track with a shared task list in SharePoint 2013
Introduction (00:04)
Whenever you’re working as a team on a project or a joint initiative you need to keep track of who is doing what by when. Using a shared task list in SharePoint is a great way to coordinate what needs to be done. In SharePoint 2013 the task list has been greatly improved. It’s now much quicker to add tasks and you can easily re-arrange them and group them into tasks and subtasks. The new TimeLine view gives you a nice, graphical overview of your activities to help you stay on track. Let me show you!
Getting started with a site and task list (00:40)
During our last team meeting we started planning for the launch next month of our training offering GetSharpVideos. We agreed on a number of action items that I noted down in our shared OneNote notebook.
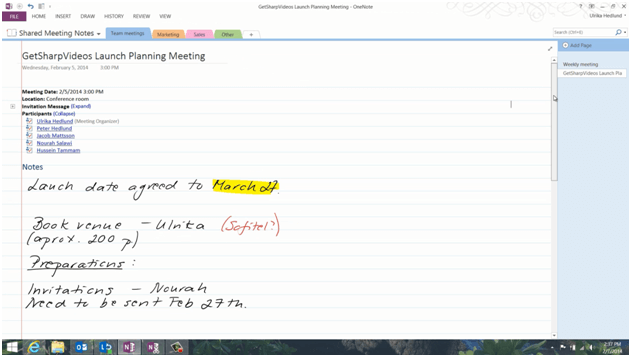
In order to keep track of the assigned tasks we decided to use a shared task list in SharePoint 2013.
If you don’t already have a SharePoint team site for your task list you can easily create one. To create a new site in SharePoint 2013 click the plus sign where it says “new site” under the “Sites” tab. Give the site an appropriate name I’ll name this one “GetSharpVideos Launch” and click “Create”.
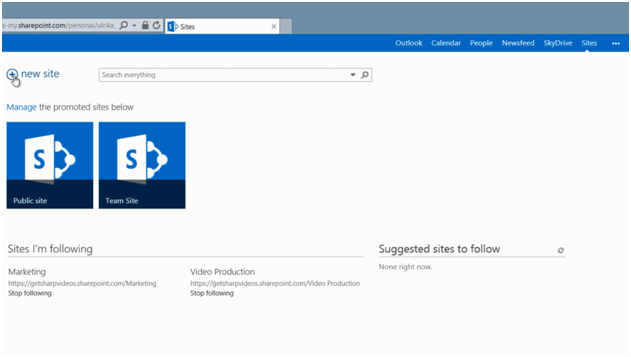
After a little while a new team site is created where we can start collaborating with each other.
To create a shared task list with a nice project summary view, I can click on the tile called “Working on a deadline?” in the “Get started with your site” menu. If you don’t see this option on your site you can add a task list by clicking “Site Contents”, “add an app” and select the app called “Tasks” to add it to your site. I’ll click “Home” to go back to the site and I’ll click on the “Working on a deadline” tile. I’m asked if I want to add the tasks and calendar apps to my sites. I’ll click “Add them”.
Getting an overview with the Project Summary (02:07)
Here you can see the “Project Summary” web part, with the timeline. You can add desired milestones or important tasks to the timeline to give everyone a quick, visual overview of the status. To go to the task list click “Tasks” in the left side menu or click “Edit” in the project summary web part to start editing your task list.

The default view when you add a task list in SharePoint 2013 is the “Quick Edit” view. Here you can quickly add tasks by typing in this small grid. To see my notes and the task list side by side I’ll dock the task list window to the right by pressing the Windows key and arrow right on my keyboard, then I’ll mark the window with my notes and press Windows Key arrow left to dock it to the left. This works if you have Windows 7 or later.
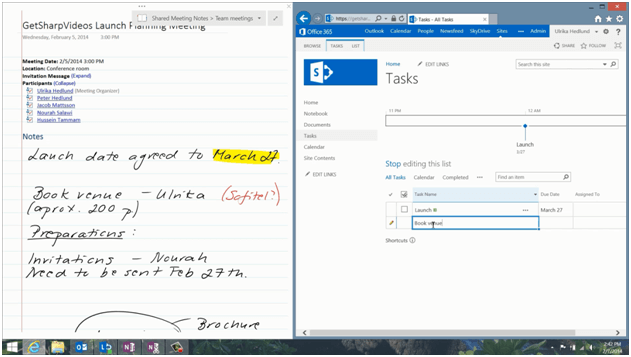
First I’ll add the actual launch and select the date in the date picker. This isn’t really a task, but I’ll add it anyway to have it visible on the timeline. When I click “Enter” you can see that the task is added to the Timeline view. The first task you add is automatically added to the Timeline. If you don’t want it there just click “Remove from timeline”. But I want to keep it there so I’ll just close down this window. Later when I’ve added more tasks I’ll go back and work more on the timeline.
I’ll go back to my notes and start filling in the tasks. To assign a task to someone, just start writing the name in the “Assigned to” column, SharePoint will look in the address book and suggest names. SharePoint uses a more natural human language, so here SharePoint is showing the date I entered as “three days from now” which is much easier to understand than numbers.
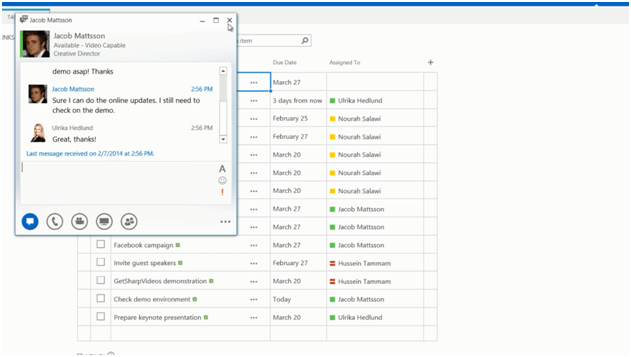
I’ll continue to type in all the tasks from my notes. Going back to my notes I can see that Jacob would confirm if he could do the online awareness and that he would check the demo site as soon as possible. If you are using Microsoft Lync you can see if the person you assigned a task to is available by looking at the little round presence indicator. Since Jacob is online, I’ll send him an instant message using “Lync”.
Jacob – are you able to do the online updates for the launch? And also, don’t forget to check the demo as soon as possible! Thanks!
I can see that Jacob is writing a response:
Sure, I can do the online updates. I still need to check on the demo.
Great! Then all the tasks have been correctly added.
Changing the view of the task list (04:47)
By default the “Quick Edit” view only contains three columns (“Task Name”, “Due Date” and “Assigned To”). If you would like to show additional columns, click the ellipsis, “Modify this View” and here you can mark any existing field you want to add to the Quick Edit View. Typical fields would be “Description” and “Start Date”.
In addition to adding existing fields, you can also create your own. To create a new column, click the plus sign. Select which type of column you want to create. Here I’ll select a text column and then give it a name. I’ll name this “Task outcome”. The field will be available to everyone, but it won’t show up in the “Quick Edit” view for the other team members unless they add it. To stop editing the list click “Stop editing this list”.
I’ve already booked a venue for the event so I’ll mark the task as complete by just checking the box. I’ll mark the task, and then click “Edit this list”. I’ll write some text in the “Task outcome” column to share it with the rest of them team, “Sofitel confirmed for 200 people”. There!
Re-arranging your tasks (06:02)
Now I want to rearrange the tasks a bit to get a better structure. When you are in the editing mode the task menu tabs appear at the top of your screen. Click “TASKS” to access the tools for working with your tasks. Here you can easily move tasks up or down, insert new tasks and create subtasks by indenting tasks. I want to group the tasks related to invitations so, I’ll click “Insert”, name it “Invitations” and then I’ll mark the 2 tasks underneath by holding down “CTRL” as I mark them and then click “Indent”. An even quicker way to create subtasks is by using the keyboard shortcut “Alt+Shift+Right arrow”. You can see all the available keyboard shortcuts by clicking the information sign at the bottom of the task list.

Adding tasks to the timeline (06:57)
Now that I have my tasks in order I want to work some more on the timeline. To add a task to the timeline mark the task by clicking in the first column. Right-click and select “Add to Timeline”. I’ll mark one more task and add that to the timeline as well. When I click on an item on the timeline the “TIMELINE” tab appears with more menu options.
With the tools on the “TIMELINE” menu you can change how the tasks are displayed. You can change the background and font color and style. Highlight tasks that are important for your team to see on the timeline.
Other ways to see your tasks (07:33)
There are a number of different ways in which you can view your tasks. If I click “Calendar” I see the tasks mapped out on a calendar. To get a graphical view of all your tasks, not just the ones on the timeline, click the ellipsis and then select “Gantt Chart”. The Gantt view is extremely powerful if you have tasks with dependencies.

I can also click the ellipsis and select only to see “My tasks”. If you frequently use Outlook to keep track of your tasks you can synchronize your SharePoint tasks to Outlook.
To synchronize your tasks in the SharePoint task list to Outlook, Click “LIST”, and then “Sync to Outlook”. Mark the check box and click “OK”. After a while your task list will appear in Outlook and any changes you make to your tasks here will be synchronized back to the SharePoint task list and vice-versa.

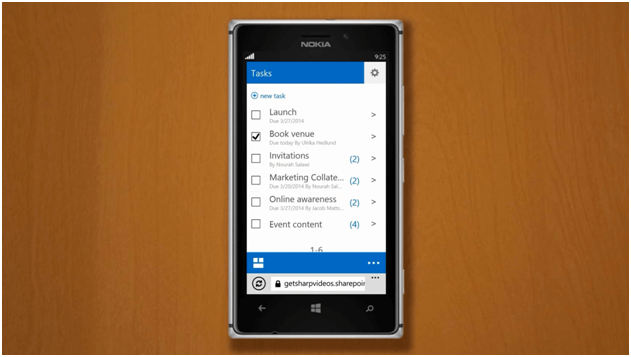
You can also view and edit the task list using a mobile device. The view of the task list is then optimized for a small screen and you can easily see all tasks and which ones have been completed. By clicking the arrow next to each task group you can see the underlying subtasks.
Sharing the task list (08:52)
Now it’s time to share the site with the other team members. At the top of the team site I’ll click “Share”. In the “Invite people” text box I’ll enter the names of the people that are involved in the launch event. In the text box underneath I’ll write a personalized message to the team and click “Share”.
Let’s switch over to Nourah to see what this looks like when she opens up her inbox after the weekend. Here she can see the email invitation to the site. From here she can click on the link to open up the site. Right away she can see in the “Project Summary” that one task is late and that the next one is due in 17 days. To open up the full task list she clicks the “Task” link in the Quick Navigation bar. Here she can see all the tasks and she can open up the ones that are assigned to her to edit them.

By sharing a task list in SharePoint like this, it’s easier for all of us to stay on track and prepare a successful launch.