Stay on top of your tasks
Learn how to stay on top of your tasks using Outlook 2013
Introduction (00:04)
In order to keep track of things Outlook provides you with a task list. A task should be single to-do item that you can easily mark as complete when it’s done. In this video you’ll different ways of adding and viewing tasks, how to categorize tasks and how to request someone else to perform a task for you.
Using the Sneak Peak view (00:26)
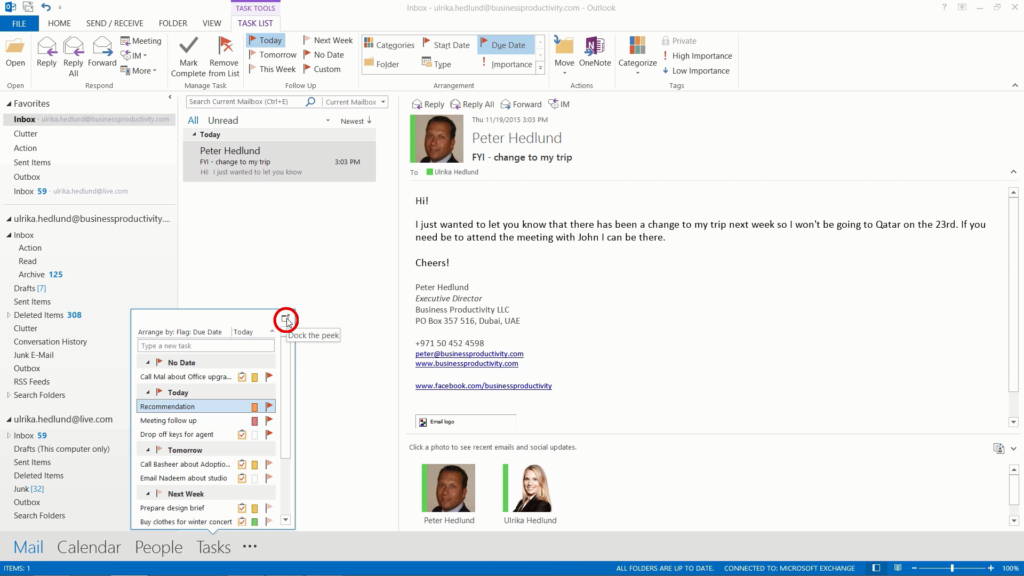
In Outlook 2013, you can get a good overview of all your to-dos without leaving your inbox by using the “Sneak Peak” View. To access the Sneak Peak view, just hover your mouse over Tasks in the bottom left navigation and a miniature window of your tasks appears.
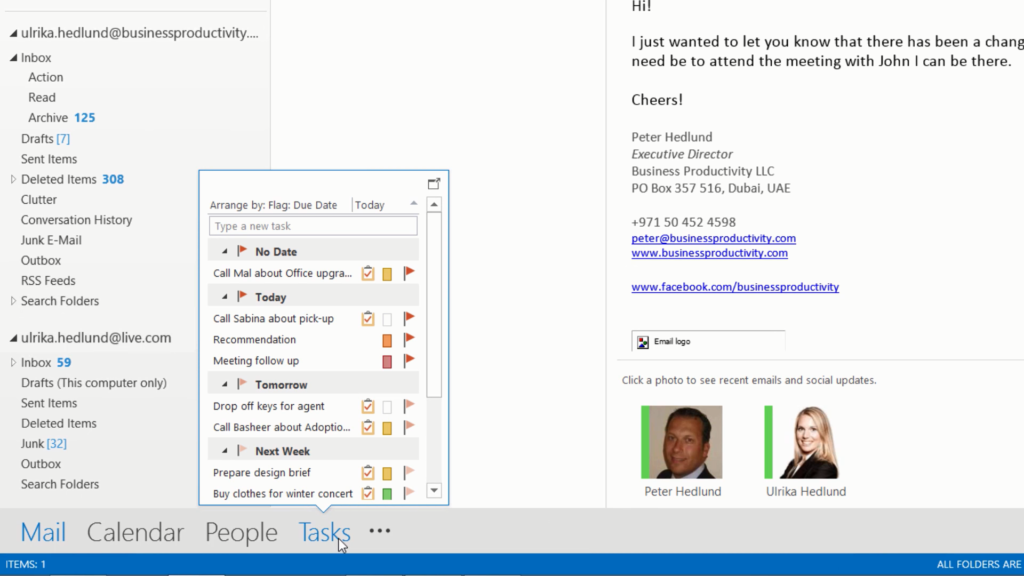
If you don’t see Tasks there, just click the three dots and then Navigation Options. Make sure that Tasks are listed as number four in the list and then increase the number of maximum items to show to 4 then click OK.
In this Sneak Peak view you see a summary of all your to-dos, whether they are email you’ve flagged for follow up or tasks you’ve added manually.
You can easily add new tasks by just writing them in the text box. I use tasks for single item actions – like making a phone call, writing an email or something I need to purchase- things that haven’t made an appointment for in my calendar. Here I’ll add a task to remember to send an email to Nadeem about the studio. When you press Enter the task is added to Today’s task list. You can easily reschedule a task by right-clicking the flag and selecting another Due Date.
To mark a task as complete just click the flag.
Turning on the To-Do bar (01:51)
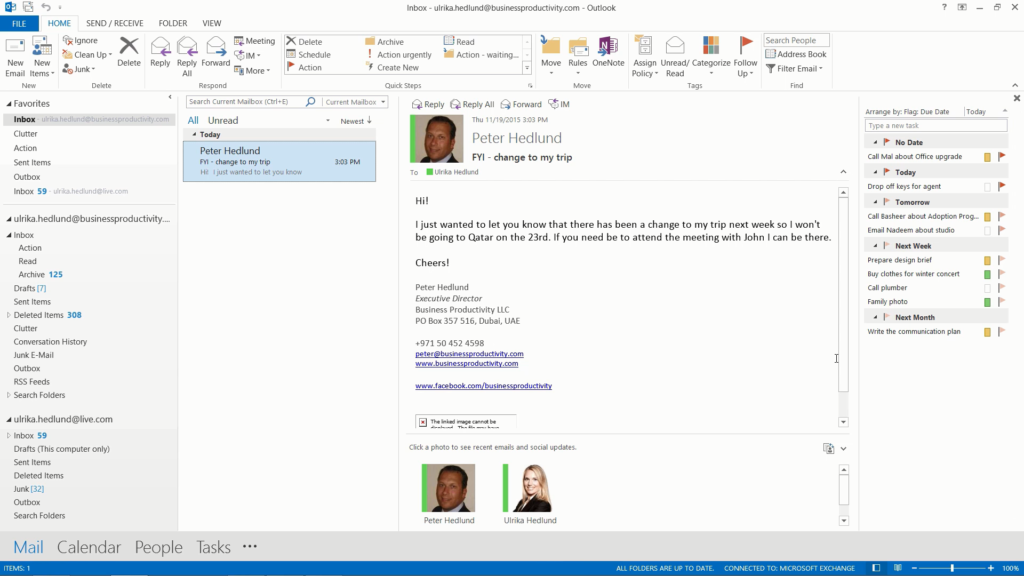
Some people don’t like using tasks in Outlook because they forget about the tasks they’ve written down since they are not visible all the time. If you always want to see your tasks, you can turn on the To-Do bar. To turn on the To-Do bar, press the little arrow in the top right corner of the Sneak Peak window.
Here you will only see your tasks, not email you’ve flagged for follow up. Another way to open up the To-Do bar is to click the VIEW tab, To-Do Bar and then select Tasks.
You can also make your tasks visible in the calendar view. Open up your calendar. In the bottom right corner click the arrow to open up the task pane.
Here you will see your to-dos each day – email marked for follow up as well as tasks.
You can easily schedule time for a task by dragging and dropping it into your calendar. I prefer to do this with tasks that take me more than 5-10 minutes. Other tasks, such as a quick phone call or email, I keep in my task list and I do them in between scheduled appointments if I get some extra time or if I need to take a break from what I’m doing to re-energize.
Tasks that haven’t been marked as completed will automatically be moved to the next day.
Accessing tasks on your mobile device (03:12)
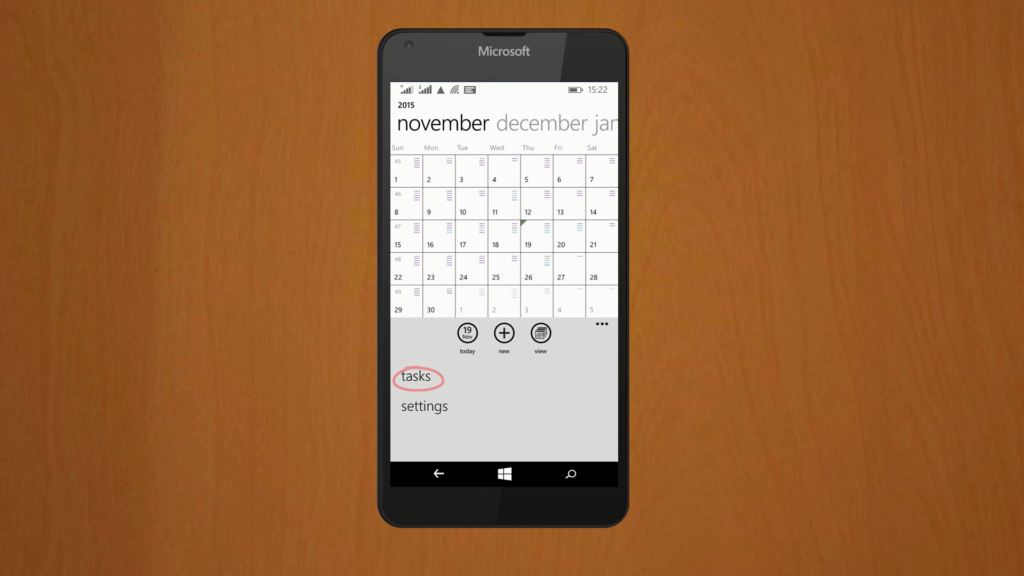
If you’re using an online version of Exchange, you can access your tasks from anywhere – via the web or on your mobile. On a Windows device, go to the calendar and click the more options menu at the bottom right corner and select tasks.
Here you can easily see all your tasks, add new ones and mark tasks as completed. If you’re using an iPhone you can configure your account to synchronize Reminders. You will then find your tasks in the Reminders app.
Understanding the To-Do list (03:43)
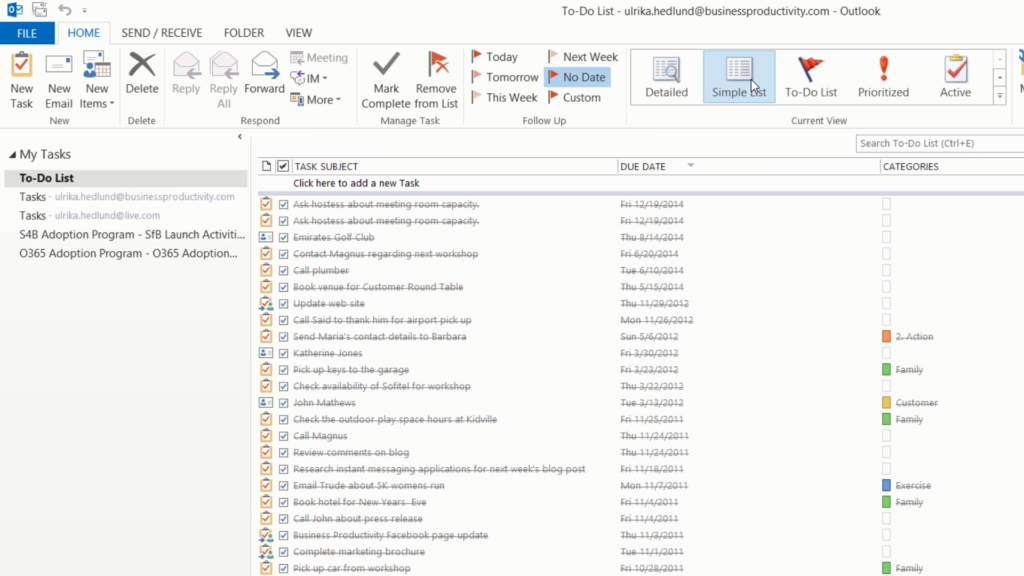
To get a better view of your tasks, click Tasks in the navigation pane. The default view when you go to your tasks is the To-Do list. This is an aggregated view of your to-dos from multiple sources. You can click the folders in the left navigation to see where the tasks are coming from. Here I have tasks that I have added myself to Outlook, here I have tasks that have been added to our SharePoint team task list that I’ve synchronized to Outlook.
I’ll go back to the To-Do view. In this view you can only see your active tasks that you still need to act on. When you complete a task it’s removed from your task list but it’s not deleted from Outlook. If you want to see a list of all your tasks – completed and active, on the HOME tab, in the “Current View” section click “Simple List”. I highly recommend that you check this view out once in a while, because it’s a real satisfaction to see all the tasks that you have actually completed!
In the To-Do view all task are arranged by Due Date. You can change how the tasks are arranged to give you a better overview of your tasks. Right-click “Arrange By” and select how you want to see your tasks. If you select “Arrange By: Folder” you will see where all to-dos are derived from. Here I can see that I have two items in my Action email folder that I’ve flagged for follow up, I have tasks from two different SharePoint lists as well as my own task list.
Managing tasks by categories (05:19)
Another way of sorting your to-do list that I find very useful is by categories. The use of categories differs from person to person, some group their tasks by type – such as calls, errands and so on, others use categories to group tasks by project or customer. I keep my categories rather simple. Since categories are the same across all Outlook views, I have categories set up for email- such as “Action” and “Action urgently. I also have categories that I use for appointments as well as tasks such as “Customers” and “Family”.
Assigning categories to tasks (05:56)
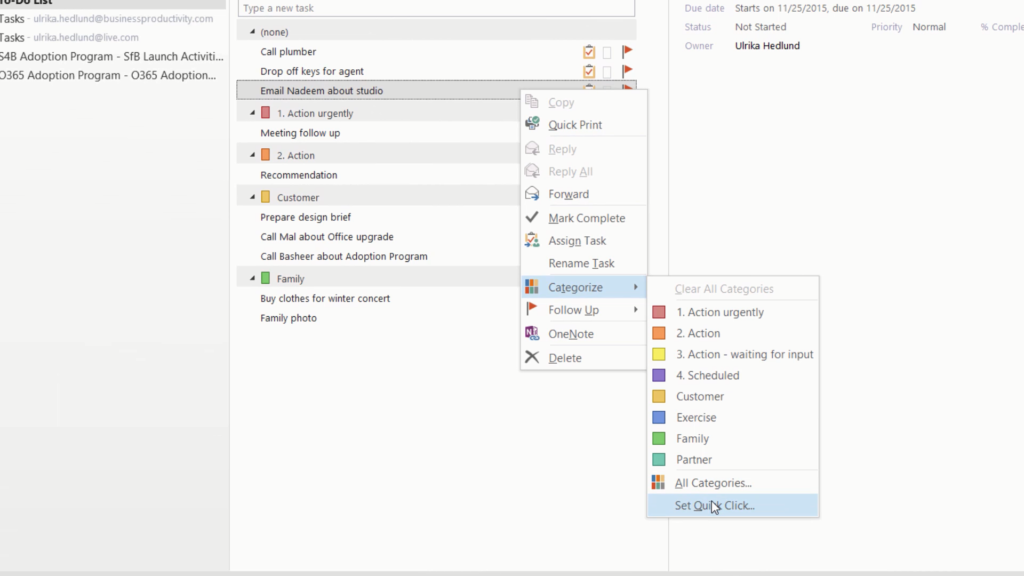
To assign a category to a task just right-click the task, select “Categorize” and select your category. If you often assign tasks to the same category you can set a “Quick Click” category. Since I often assign tasks to my Customer category I’ll click “Set Quick Click” and in the drop down I’ll select the Customer category.
Now I can assign the task to the Customer category by just clicking the square next to the task. Automatically the task is assigned to the Customer category. Another way to easily assign a category to a task – if you have them arranged by category like this, is to just drag and drop. Grab the task you want to categorize and drag it to the category group it belongs to. This is a very efficient if you want to categorize multiple tasks at once.
Creating a new category (06:52)
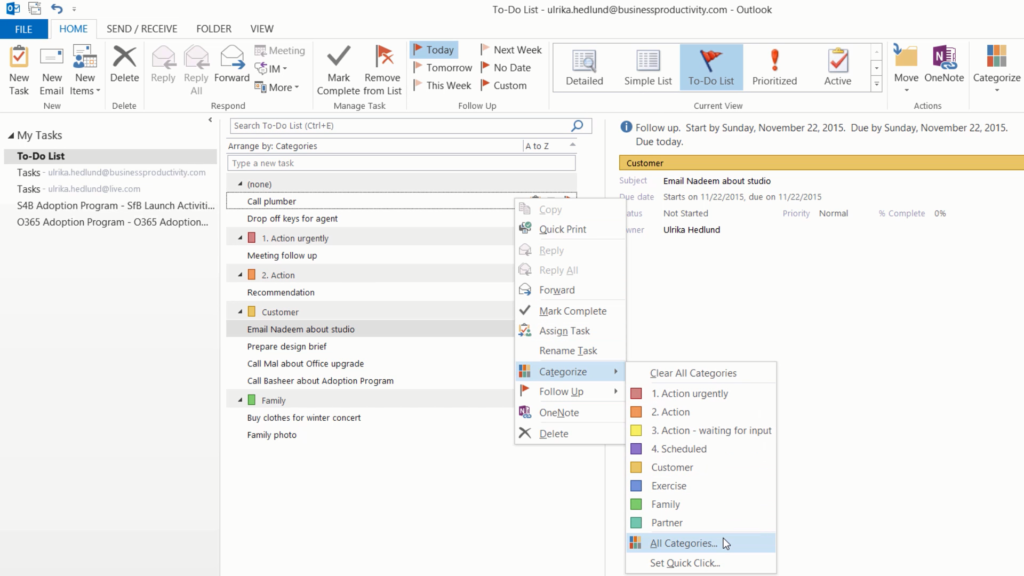
Here I have two tasks related to our rental property. Since I often have tasks related to the property, I will create a new category to organize my tasks better. To create a category, right-click the task and select “Categorize” and then “All Categories”.
If you haven’t used categories before, you can select one of the default colors and just click “Rename” or if you like me have used all your default categories click “New”. I’ll name this “Rental Property”. You can select which color you want for the category, I’ll just keep the default dark green and click OK and then again OK. Now my task has been assigned to the new Rental Property category. I’ll drag and drop the second task to the new group to apply the same category.
Assigning tasks to other people (07:46)
This task, to call the plumber, I have actually asked my co-worker Peter to do. I’ll see if he is online and start an instant messaging conversation with him to see if he has done it. And he replies,” Sorry no I keep forgetting”. In Outlook you can assign tasks to other people. This is a functionality that has been in Outlook for many years, but unfortunately it hasn’t been further enhanced. In order to assign tasks to others, both parties need to have the Outlook desktop client. It won’t work if you are using the web based version of Outlook or a mobile. In this case Peter and I are both using the desktop version of Outlook, so I’ll assign the task to him so he doesn’t forget.
To assign a task to someone right-click the task and select “Assign task”.
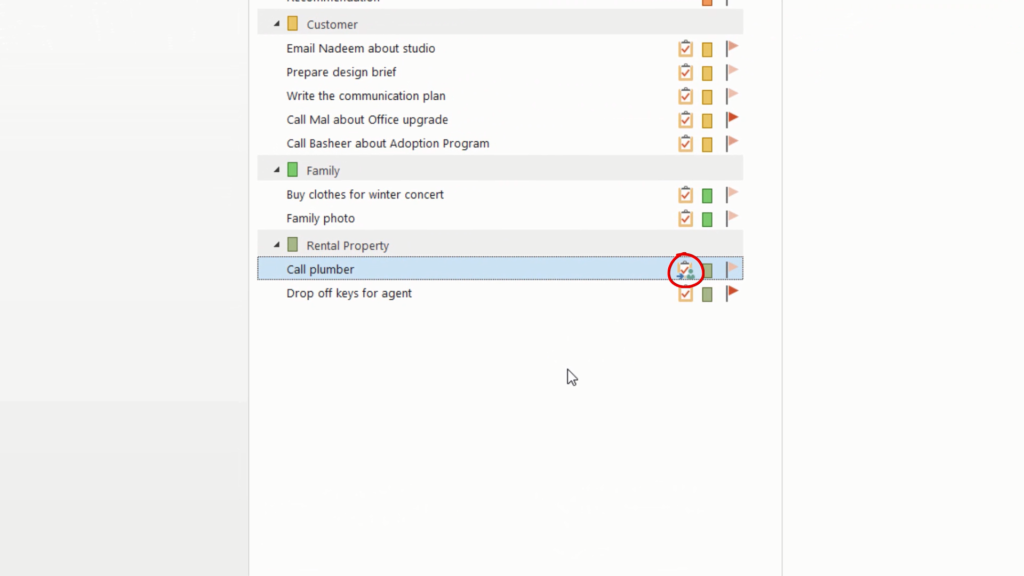
Add the name of the person and send off the task. You will have an updated copy of this task in your own task list. Tasks that have been assigned to others have this little logo.
Peter will receive an email where he can choose to accept or reject the task. Once he has completed the task an email notification will be sent to me and the task will be marked as completed in my task list.
If you are working in a team or if you are working on a project I prefer using a SharePoint task list. You can synchronize SharePoint task lists to Outlook to keep track of your tasks there.
Closing (09:18)
As you can see, using tasks is a great way to stay organized and keep track of the things you need to do.


