Share important business partner contact details with your team
Learn how to use contact libraries using SharePoint in Office 365
Introduction (00:03)
Welcome to Business Productivity, I’m Ulrika Hedlund. Have you ever been new to a company and felt completely lost because you don’t have the contact details to the people you need to do business with? Well, this is a very common scenario. It takes time to collect contact details to the people you need to deal with.
In this video I’ll show you how you can create a contact library in Office 365 to share contact details across your team. Another benefit of doing this is that you don’t have to worry about losing valuable contact details if one of your employees leaves. Let me show you how!
Part 1
Create a contact library (00:39)
To create a “Contacts” library click “Site Actions” and then “More Options”. And then select “Contacts” Give it a name. I’ll just name it “Business Partners” and click “Create”. I now have a contact library that I can share with the others in my team.
Add contact details (01:00)
To add a new item I’ll just click “Add new item” and I’ll fill in the information here. Only the fields with the red star are mandatory.
The other fields I can fill in as I choose. In this case, I’ll just fill in the most important information; last name, first name, email address, the company and the phone numbers. And then I’ll click “Save”. That information is now visible in the list. If you only want to view the information in the list you can click “Browse”.
This way, the menu disappears and you can focus on the content.
Edit the columns (01:37)
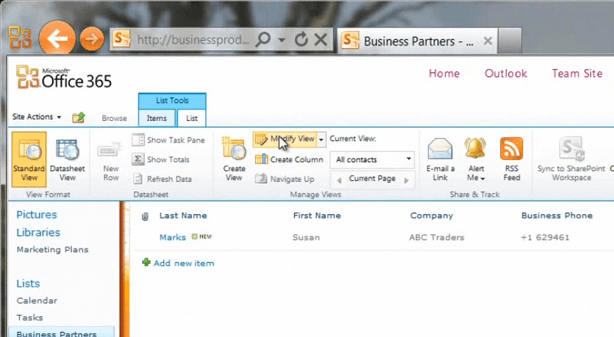
As you can see we have a column with a home phone number. This is empty. Here I would rather have the mobile phone number. So to edit this view I’ll go to the “List Tools” and click “List” and then choose “Modify View”.
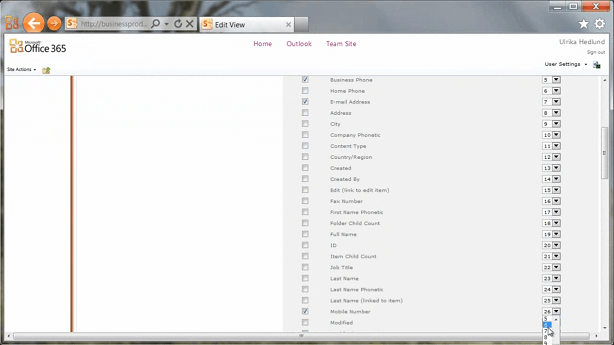
Here I can see all of the column names and whether or not they are displayed. I can also see the order of the columns.
So in our case I’ll remove the home phone number and instead I’ll choose to show the mobile phone number. I also want to change the order so that the mobile phone number comes after the business phone number. So I’ll just put the mobile phone number as column number six. I’ll scroll down and click “OK”. There! Now I have the columns in the order that I want them.
Edit contact details (02:24)
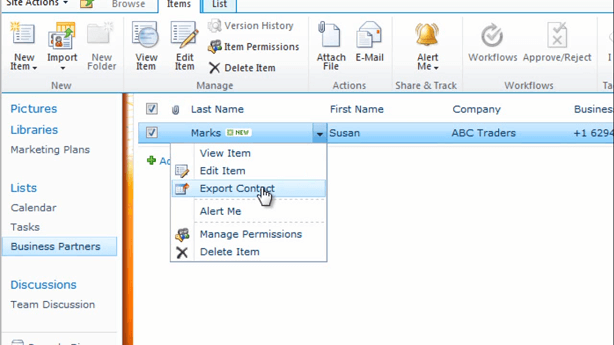
At any time if you want to these contact details you can just mark the little check box and then the menu for this item will appear.
You can also click on the drop down list box and choose to “Edit Item”.
Export contact details to Outlook (02:39)
Many times you want to have contact details in Outlook. In order to do that you can just click “Export Contact”.
Click “Open”, and the contact opens up in Outlook. Exporting the contact is one way to get the contact details in Outlook. But now I want to show you how you can connect the entire contact library to Outlook. And this is where it gets really powerful. So to do that go to the “List” and choose “Connect to Outlook”.
Click “Allow”, and then “Yes” to connect this SharePoint list to Outlook. There is the card in Outlook. Now I can use Outlook to create new contact details. So for instance I can create a new contact and I can fill in the information, add a picture and then type in the rest of the information. Now, normally you wouldn’t type this information in, you would probably copy it from an email signature. And then click “Save & Close”.
Export contact details back to SharePoint (03:40)
Now, instead of adding new contacts like this I can copy and paste contacts that I have in my Outlook already. To do that I’ll just go to my contacts folder and then I’ll mark the contact.
And then I’ll just drag and drop it into my new library. And there we go! Now, if I go back to our shared workspace and click “refresh” you can see all of the new contacts.
Create a list of your contacts in Excel (04:10)
Having your business partners contact details in a contact library in SharePoint is really powerful. Say for instance that you’ve invited all of your business partners to an event and at the door you want to have a check list of who’s there or not. To do that , you can just go to the “List” and choose export this list to excel [“Export to Excel”].
I’ll choose to “Open” in Excel and “Enable” and now I have all of the contact details in a list that I can use at my event.
Part 2
Now, I’ve shown you how to create a contact library and how to connect it to Outlook. In this second part of the video, I’ll show you some more advanced settings on how you can add more valuable information to your contact library.
Make the pictures of your contacts visible on your team site (00:14)
One thing that really annoys me is that the pictures that we have on the contact cards in Outlook aren’t by default visible in our list in SharePoint. But now I’ll show you a little work-around for how for how you can make these pictures visible. Because the pictures are stored with the contacts details as an attachment. So to do that, let’s go to our “List Tools” and let’s choose to create a new column [“Create Column”].
And we’ll just name it “picture” I’ll choose “Hyperlink or Picture”, and I’ll choose to format this as a picture.
I don’t want to add this to the default view [uncheck box] and click “OK”. Now I need to copy the image into the picture column that I just created. So to do that I’ll just click “Edit Item”. Copy the shortcut and paste it in here.
If you create a new view using SharePoint design you don’t have to go through this manual stuff but this is the easy way to do it.
Create a new view (01:13)
Now I want to create a new view where I can see the pictures. I’ll select a “Standard View”
and I’ll just call this “picture details”. Here I don’t want to see the attachment or the first name, last name. I’ll just select the company, the email, the full name and the picture. I want the picture to be the first thing that we see. After that the full name, the company and then lastly the email address. I’ll also select a different style for this view. I’ll select the newsletter style. And click “OK”. And we now have a new view showing the photographs of our contact details. To go back to the other view you just click here and choose “All Contacts”.
And you will see all of the information that we had.
Create a new column (02:22)
Being able to add custom fields to your business partner contact is really powerful. Say for instance that you want to add a column that says “service provided” so that everyone know which business partner to contact depending on the services you need. To do that, we’ll go back to our “List Tools” and we’ll create a new column. We’ll name it “services provided”. And we’ll choose this to be a “Choice menu”.
I will select my choices here.
And I will allow “Fill-in” choices. This means that if the choices that I mentioned above aren’t available you can fill in your own. So I’ll choose “Yes”. And I don’t want anything to be the default. And I’ll click “OK”.
To quickly edit multiple rows (03:17)
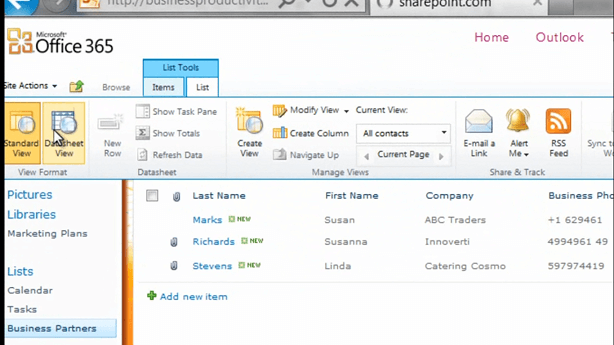
Now you can see that I have a new column called “Services provided”. To quickly edit multiple rows you can click show in “Datasheet View”.
Now you can work with the information just like you would in an excel spread sheet. So here I will choose “PR”.
I can also drag content, if it’s the same [content in multiple contacts] (Left-click in the bottom right corner of the cell and drag the mouse down to copy the contents to multiple cells).
But in this case I’ll change this to “Events management” and “Catering”. And then I’ll just go back to the standard view.
Filter your columns (03:49)
Now you can filter using the column names. So for instance if I only want to show partners that provide PR.
I will get the results of the ones providing PR services. To clear the filter just click “Clear filter”, and again you will see all of the contacts. It’s important to know that the extra columns of information that you add to your contact details in SharePoint will not be synchronized back to Outlook. So this information is only visible here.
Closing
Once you have contact details in your workspace you can leverage this information in a number of different ways. I’ll show you how in another video. I’m Ulrika Hedlund for Business Productivity. Thanks for watching!


