
Go beyond text to enrich your email
Introduction (00:04)
Even though a written email is a very limited form of communication, you can enrich your email messages by going beyond words and inserting graphics, tables and pictures into your email. In this video you’ll learn how to enrich your email more informative and interesting.
Changing the font for your email messages (00:23)
To make your email messages stand out a bit you can change the default font being used in Outlook. To change font of your email click “FILE”, “Options”, “Mail” and then “Stationary and Fonts”. Under “New mail messages” click “Font”. I recommend that you use easy to read fonts. I’ll select this one (Segoe UI Semilight) and then I’ll reduce the font size a bit. Use dark font colors; such as black or dark gray or blue. Stay away from red and green. To apply the change I click “OK”.

Then I’ll apply the same font for “Replying or forwarding messages”. I’ll click “OK”, and “OK” to apply the changes. Now next time I write an email my selected font will be used.
Emailing contact information to others (01:11)
Here I have an email from Ariel, asking me to share the contact details of my colleague Nourah with her. Instead of typing the information in the email, I can quickly add Nourah’s business card. To add an Outlook business card into an email, click “INSERT” and then “Business Card”. The most recent business cards that you inserted are available in a list. If I want to insert another business card I’ll click “Other Business Cards…” Unfortunately you don’t have a very good search interface here. I can press the letter the name starts with to jump forward in the list, but then I have to scroll manually. Here is Nourah’s contact card, I’ll just mark it and click “OK”.
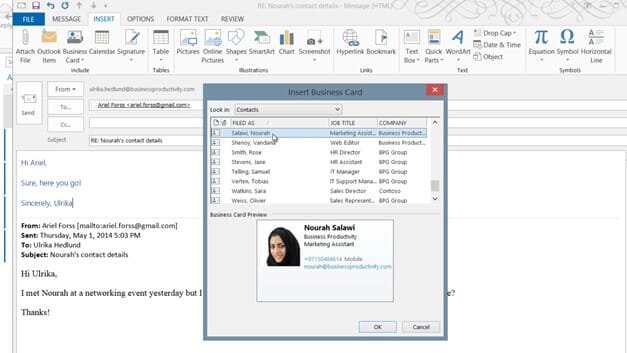
The card is inserted as a picture in the email so that Ariel can quickly see the information right away. The business card is also attached so that Ariel can easily add it to her own contact directory.
Adding calendar information to your messages (02:07)
Here I have another email. This is from Sarah asking me when I could be available to do an interview for a magazine next week. Instead of writing down the time slots when I’m available I’ll reply to this email by inserting information from my Outlook Calendar. To insert calendar information in an email click “INSERT” and then “Calendar”. In the “Date Range” drop down you can select between predefined set of days, or you can select to “Specify dates” to be more exact. I’ll select to show my calendar next week. In the “Detail” drop down I’ll select to show “Availability only”. I’ll choose only to include working hours, and to make sure that my working hours are configured properly I’ll click “Set working hours”.
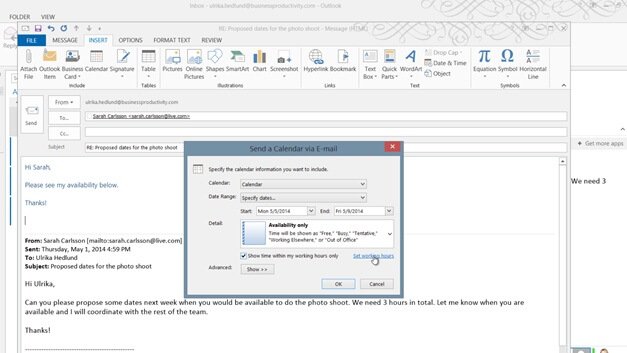
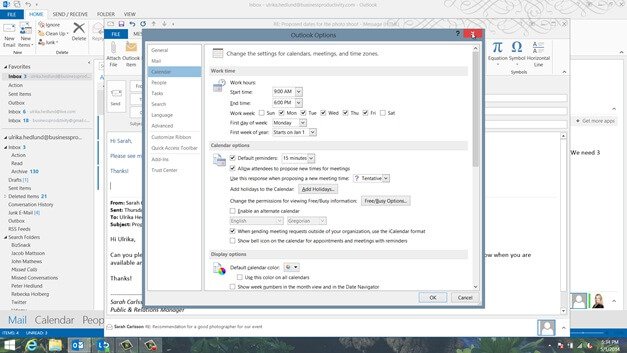
Here I can see that mine are correctly set from 9 to 6 pm so I’ll just close this down. If you click “Advanced” you can select the layout of the calendar. I’ll just keep the default which is a “Daily schedule” and then I’ll click “OK”.
A nice graphical overview of my availability next week is inserted into the email. This is a great way to share calendar information, it’s quick and it’s very rich in detail which reduces the correspondence needed to find a good time for a meeting.

Inserting screenshots (03:30)
Here I have en email from a potential customer who wants to review our courses for their employees. I’ll reply to this message and provide her with a link to one of our courses to review. Instead of just sending a link to the course, I want to make it a bit more compelling by inserting a screen clip of the course image. To insert a screen shot in an email, open up the page you want to take the screen clip from.
Here I’ll open up our course directory page, then go back to the email and click “INSERT”, and then “Screenshot”. Instead of a full screenshot I just want to select a part of the screen, so I’ll click “Screen Clipping”.

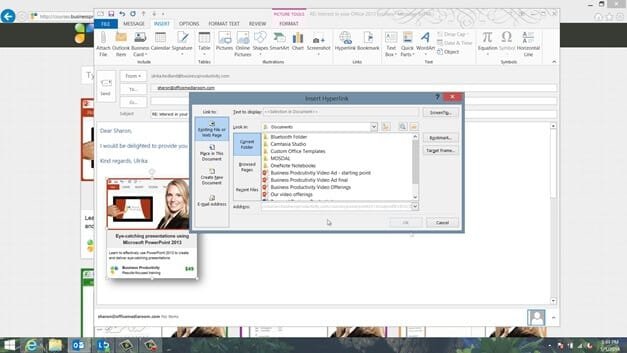
I’ll mark the part of the page I want to include in my email and then I’ll resize the image a little bit, then I can apply a nice design using the picture tools directly in Outlook. Here I’ll add a nice shadow. I’ll click “INSERT” again and select “Hyperlink” and then add the hyperlink to the course. There, that looks much more attractive.
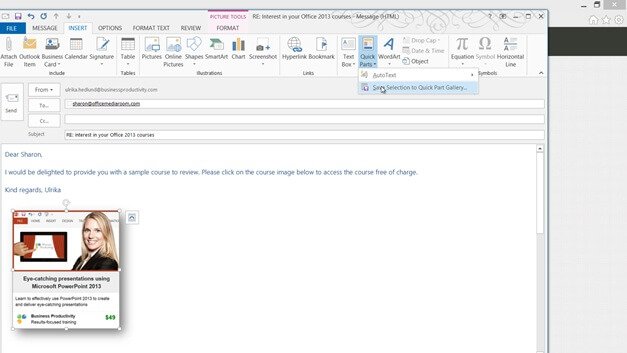
Using “Quick Parts” to save time (04:37)
In order not to have to go through the same process all over again next time a customer asks to review a course, I’m going to save this for future use. I’ll mark the picture with the hyperlink, under the “INSERT” tab I’ll click “Quick Parts” and then “Save Selection to Quick Part Gallery”. I’ll give it a name “PowerPoint 2013 Course Review” and then click “OK”. Next time I want to send the same course for review in an email I can just click “INSERT”, “Quick Parts” and then select the saved image with the Hyperlink from the Quick Part Gallery. If you do this for text and images you frequently use in your email communication you can save a lot of time.
Using the Snipping Tool (05:20)
Another tool that is really useful when sending screen clips is the Snipping Tool. I want to send an email to a friend with a link for our new course page. I’ll open up the Snipping Tool in Windows 8 by just searching for it in the search pane.

I’ll click “New” in the Snipping Tool and then mark the part of the page I want in my screen clip. In the Snipping Tool you can also highlight and mark things in the image so I’ll use a red marker to circle the Sign up section and then I’ll click “Email”.
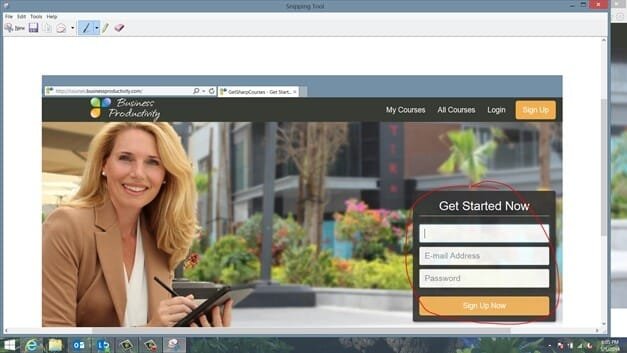
The image with the hyperlink is automatically inserted into an email. I’ll just resize the image and write a short note and then send it off to my friend.
Inserting pictures and understanding file size changes(06:03)
Here I have an email from Sarah who is asking me to provide her with some pictures for a magazine article. I’ll respond to the email by inserting some photographs into the email message. To insert a picture in the body of an email click “INSERT” and then “Pictures”. I’ll select three photographs by holding down CTRL on my keyboard and selecting the images that I want.
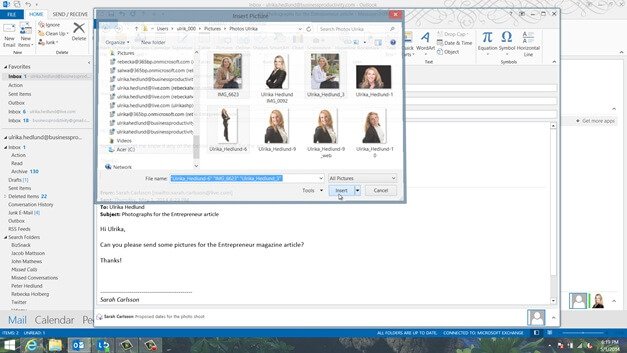
As you can see the photographs are quite large. I’ll mark each image and reduce the height. I’ll do the same for all three photographs. If you look at the properties of this email, you can see that it’s 5 Megabytes which is quite large.
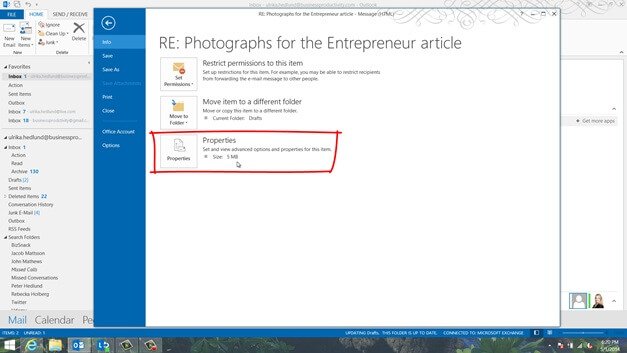
However, when you insert an image in the body of an email like I’ve done here it is automatically compressed when you send the email to reduce the size. If I go to my sent items and open up the email that I just sent, you can see from the properties that it was reduced to only 105 Kilobytes. So if you don’t worry about keeping the quality of your pictures you can insert them to the body of the email.
After a moment I get a reply from Sarah saying that she likes the photograph of me in the black suit but that she needs it in high-resolution. If you want to send an image and you don’t want Outlook to alter the quality you need to insert it as an attachment. I’ll reply to Sarah’s email and click “Attach File” and then select the requested photograph and send it to her. If I now look at the properties of the sent email with the attachment I can see that it’s 2 Megabytes. The email is sent with a photo in its original quality.
Communicating using SmartArt graphics (07:50)
Here I have an email from a customer asking us what the process is for making a customized video. Instead of replying with just a list of text I want to make it a bit easier to digest by using graphics. I’ll copy this list and use it to create a SmartArt graphic in my email. To insert SmartArt graphics in your email click “INSERT” and then “SmarArt”. Here you can select from a wide range of pre-defined graphics.
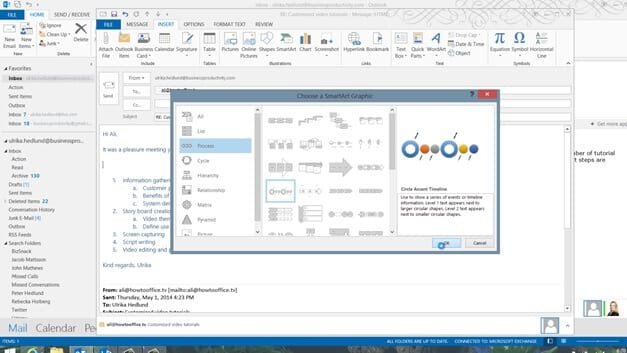
I’ll select a “Process” and then I’ll mark the bullets and paste in my text by pressing CTRL V on my keyboard. Then I’ll just remove the remaining text placeholders. There, now the graphic is inserted to my email.

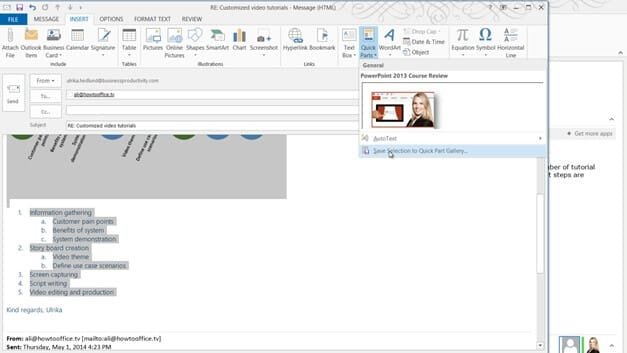
I want to change the color of certain circles in the process. So to do that, I’ll hold down CTRL and then mark the circles I want to re-color. I’ll right click, select “Fill” and then select a dark green color. There, now our process has been visualized using colorful graphics making it easier to comprehend. To save the content of this email for future use, I’ll mark the SmartArt and my text and under the “INSERT” tab I’ll click “Quick Parts” and then “Save Selection to Quick Parts Gallery”. I’ll name it “Video Process” and click “OK” to save it to the gallery and then I can send off the email.
As you have seen in this video, you are not just restricted to text in your messaging, there are numerous ways in which you can enrich your email communication.