Get organized with a digital notebook
Learn how to use Microsoft OneNote 2010 to organize your notes
Introduction (04:00)
Welcome to Business Productivity – I’m Ulrika Hedlund. Throughout the years I’ve gone through a large number of notebooks. In these notebooks I have my notes, drawings, newspaper clips and other pieces of information that I want to save.
The problem with a paper notebook is that eventually you run out of paper and when you do you have to start a new book and then you don’t have your notes with you anymore. Another challenge is to find what you are looking for. Say that I’ve written down a name in a notebook, well then it’s a hassle to go through all of the pages to find that name. It’s also difficult to get a good overview of all the things you need to follow up on.
In this video I’ll show you how you can organize your notes using Microsoft OneNote 2010 as a digital notebook. I’ll show you how you can create notebooks. I’ll show you how you can organize your notes into sections and pages, also how you can quickly find something you are looking for and finally how you can get a good overview of all the things you need to follow up on. Let me show you!
Overview of notebooks (01:15)
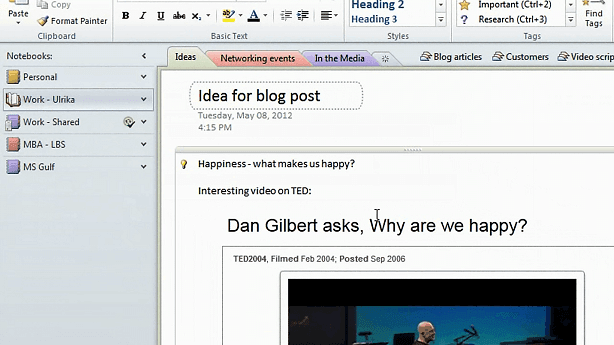
To open up OneNote, just click the Start button and select Microsoft OneNote. If you don’t have OneNote in your list of programs just start typing OneNote in the search box and it will appear under “Programs”. On the left hand side, in the navigation pane, you can see that I have 5 notebooks.
The one that’s currently open is symbolized with an open book. Here you can see that I have one personal notebook, here I keep notes related to our family, purchases I’ve done, our home, music and research on travel destinations. The next notebook contains my work-related notes. Here I save various ideas, blog articles I write, notes from various customer engagements and video transcripts.
I have one more notebook for work. This is a shared notebook that all the members of our team have access to and collaborate on. Here we have notes from our internal meetings, our strategy, marketing events and notes concerning our web site. The shared notebook is saved and synchronized to our SharePoint team site and you can see by the green check mark that all of the notes are synchronized.
Finally I have some older notebooks from my Executive MBA at London Business School and my previous job at Microsoft.
How notebooks are organized (02:45)
Each notebook can contain pages and subpages. Pages are organized into sections, and if you have many sections you can group these into a section group.
Here I have a section group called “Video Scripts” where I have sections for each product. Each section has a number of pages in it. To navigate back up you just press the green arrow.
Pages in OneNote can contain various types of information. On the first page I have typed notes and an image. On this page here I have handwritten notes taken on a tablet PC with a digital pen.
On this page I have an article screen clip that I have taken from a web site. If you insert a screen clip in OneNote the web address, where you took the screen clip from is saved, so you never have to worry about not finding the source of your clip. On this page I have a pdf document that I have inserted as a file printout in order to be able to take notes. The link to the actual file is also preserved in OneNote. Finally I have a page with a video recording of a speech I attended on Networking. Not only can you save audio and video files in OneNote, you can also search on the words being said in audio and video files.
Changing the order of pages and sections (04:10)
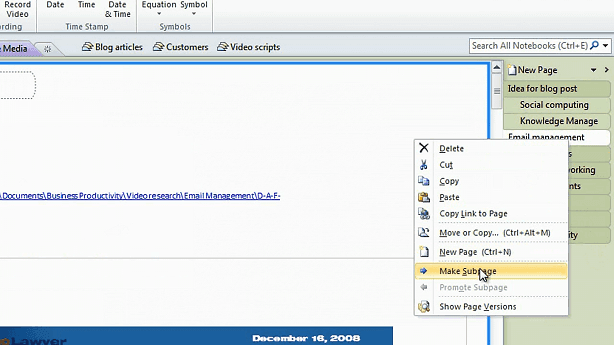
You can easily change the order of your pages. Just mark the page you want to move, hold down the left mouse button and then drag and drop the page at the desired location. You can also create subpages, the titles of subpages are indented to the right and they have a lighter color, so that you can easily see that these pages belong together. To create a subpage just right-click on the page and select “Make Subpage”.
You can collapse your subpages by right-clicking and selecting “Collapse Subpages”. To expand the pages again just click on the arrow and the subpages become visible. You can also change the order of your sections. Mark a section and hold down the left mouse button and then just drag it to the desired location. You can’t change the order of section groups unfortunately, these are sorted alphabetically by OneNote.
Closing and creating notebooks (05:08)
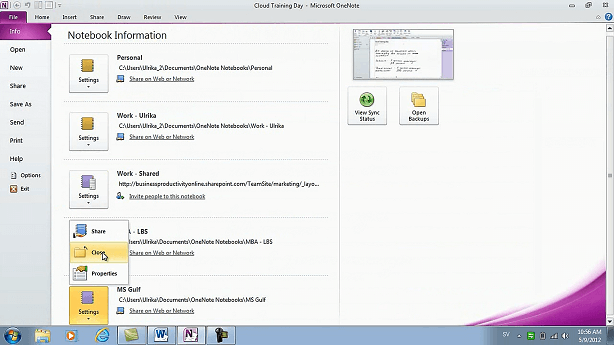
If you are not using a notebook anymore you can just close it. This doesn’t delete the notebook from your computer, it just removes it from OneNote. To close a notebook, right-click and select “Close This Notebook”. Or you can go to “File”, “Settings” and then select “Close”.
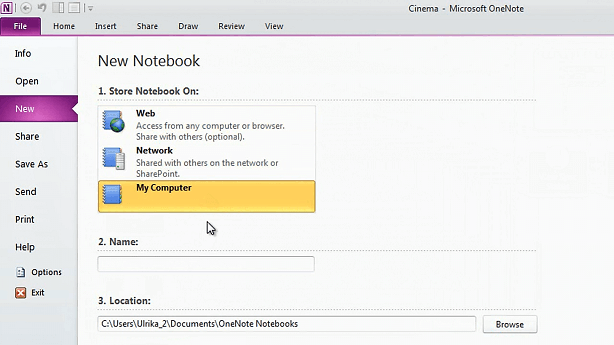
Now I want to create a new notebook that will contain notes related to my involvement in London Business School as an alumnus. To create a new notebook, go to the “File” tab and select “New”. Here you can select how you want this notebook to be stored. You can store it on the web, this way you can access your notes from any computer using a browser. You can also select a network location such as a SharePoint document library or a traditional file share. Finally you can save it locally on your computer. Here I’ll just select My Computer.
I’ll name the Notebook LBS Alumni, and click “Create Notebook”. A new notebook is created for me with a new section and an empty page.
Adding notes to your notebook (06:17)
I’ll start by renaming the section. I’ll right-click and say “Rename”, here I’ll type “Reunion Events”. The title of this page will be “Class reunion 2012”. OneNote adds the date and time for when this note was created. Now I can start writing my notes about our class reunion. I can type anywhere on the page. Just place the mouse cursor anywhere on the page and you will see a frame appear. You can just start typing in the frame. Now I’ll type: “Suggested locations for reunion: Dubai and London.” And then I want to add a list of proposed guest speakers. To add bullets to your list, just go the “Home” tab and click bullets. Here I’ll type the name of a great professor I had in Change Management, now I want to add another name of my professor in Brand Management. Unfortunately I can’t remember her last name. Luckily with OneNote I can search notes that I have taken years back in time.
Searching your notes (07:23)
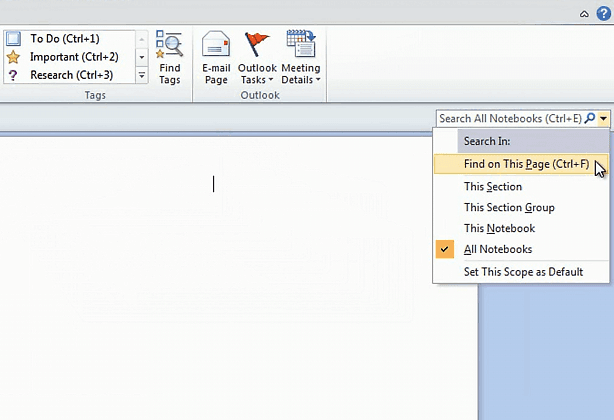
In the upper right hand corner you can find the search box. If you click the arrow next to the magnifying glass you can see the various search scopes. I can either search this page, this section, this section group, this notebook or all notebooks. I’ll leave the default which is “All Notebooks”
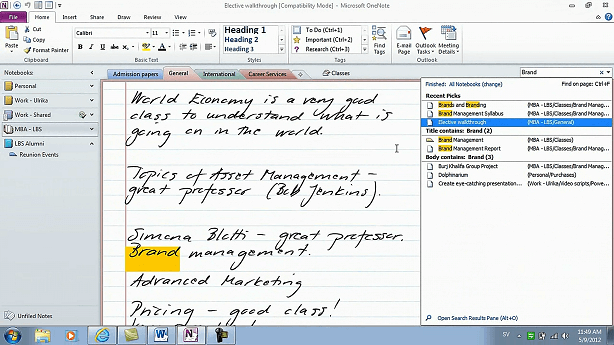
I’ll search for “Brand” and here I can see a number of search results from various notes I’ve taken throughout the years. I’ll select this page called “Elective Walkthrough”. This page contains handwritten notes.
As you can see OneNote can even search handwritten text, now with that said, my handwriting is pretty neat, I can’t promise that OneNote will be able to understand your handwriting. Here I can see that I’ve written down the professor’s name for Brand Management, however, since I’ve written this name down myself I don’t know if this is the correct spelling. I’ll look at another search result so I’ll write “Brand” again and I’ll look at a page called “Brands and Branding”. Here I have a screenshot from her lecture. The search engine is very powerful it can even search for text in images. If I scroll down I can see that her name is written in the bottom of the lecture slide. Now I can go back to my note by clicking the back button and add her correct name to my list.
Tag things for follow up (08:35)
Now I want to add some notes on a suggested book that we can have as a give-away. As soon as I hear of a good book I write it down, so I know that I have recommendations for books in all of my notebooks. Now I just need to find them.
To easier find things that you want to follow up on in OneNote you can tag them. There are number of different tags you can use, you can customize these or create your own.
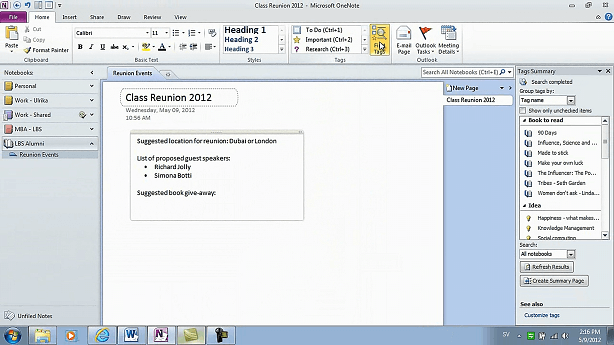
I’ve used a tag called “Books to read”. If I click on “Find tags”, I’ll get a summarized view of everything that has been tagged.
Here I’ll select a book called “Tribes”, I’ll copy the name of the book, go back to my slide (page) and just paste in the name.
Closing (09:20)
As you can see, having all of your notes in one place and being able to take them with you wherever you go is a great benefit. Having your notes on your computer enables you to organize and search them in a much more efficient manner. I’m sure that once you start using OneNote, you will grow to love it. It’s definitely one of my favorite applications. I’m Ulrika Hedlund for Business Productivity – Thanks for watching!


