
Create eye-catching presentations using SmartArt
Introduction (00:04)
When you give a presentation it’s important that the PowerPoint slide is only there to support your message. Instead of using just text in your slides, it’s really powerful to use graphics.
In PowerPoint 2007 Microsoft introduced something called SmartArt and even though it’s been in every version of PowerPoint since then, very few people know how to use it effectively. The beauty with SmartArt is that you don’t have to waste time drawing shapes yourself, this is automatically done for you.
To show you how this works, I’m going to use a presentation that I’ve created on the topic “Brand Management” and I’m going to convert the texts in this slides to eye-catching graphics.
Introduction to SmartArt graphics (00:48)
Here I have a presentation about brand management. As you can see, I only have text in my slides.

I’m going to use SmartArt graphics in PowerPoint 2013 to convert the text into graphics that look like this. As you can see, the slides are much easier to digest and the graphics help to communicate the message of each slide.
Converting text into SmartArt (01:13)
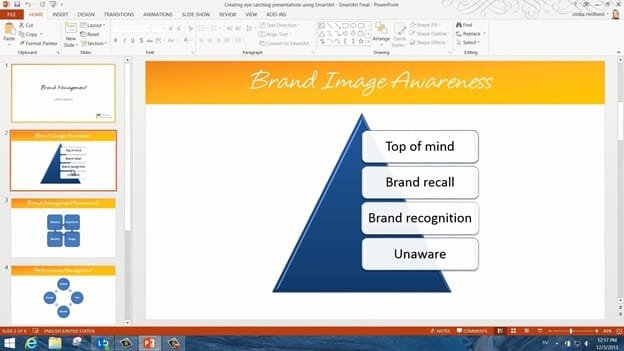
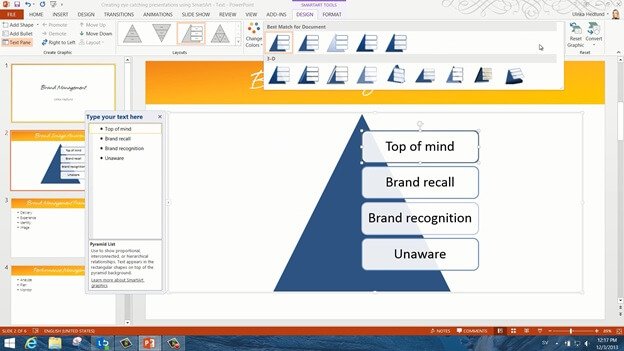
The message of this first slide is that very few brands are top of mind. Most of the brands are totally unknown to us. So to illustrate this I will turn this text into a pyramid. To convert text into SmartArt, mark the text, right-click and select “Convert to SmartArt.” Here I’ll select the pyramid graphic. A pyramid is inserted for me with the text in my slide. The “SmartArt Tools” Menu opens up and here I’m given more options to modify my SmartArt graphic.

Under the “DESIGN” tab I can change the layout of the pyramid. I get a live preview of what the different layouts would look like. Here I’ll just stick to the original layout. In the “SmartArt styles” section I can change the color, so here I’ll just change it to a darker blue. I have a gallery of different designs that I can apply to my SmartArt graphic. I’ll select a nice 3D-design for my pyramid.
Working with individual shapes (02:19)
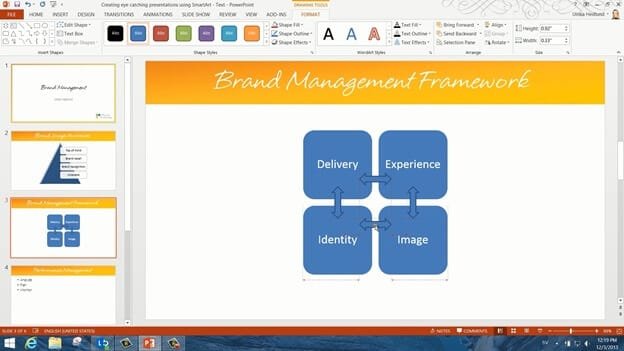
On this next slide I want to show how these four elements affect one another so I’ll turn the text into a matrix. I’ll right-click again and select “Convert to SmartArt” and here I select the “Basic Matrix”. Even though this is a good start, I’m not 100% happy with this graphic. To modify SmartArt graphics further you can convert them into normal shapes. To do that have the SmartArt graphic marked and under the “SMARTART TOOLS” “DESIGN” tab, click “Convert to Shapes”. Now the graphic has been converted to individual shapes that I can work with independently. I’ll right-click and select “Group” and then “Ungroup”. Now I can remove the background square by marking it and pressing “Delete” on my keyboard. I’ll insert an additional arrow shape by clicking “INSERT”, “Shapes” and then selecting a Block Arrow. In PowerPoint 2013 Microsoft has introduced alignment guides, these are really useful when you are positioning objects. The red lines appear automatically as soon as you are aligning objects or text next to each other. I’ll copy the arrow using the keyboard shortcut CTRL+C and then paste it in using the keyboard shortcut CTRL + V. I’ll position this arrow next to the first, again being helped by the alignment guides. I’ll copy and paste again and this time I want to rotate the arrow 90 degrees. I’ll go to the “DRAWING TOOLS”, “FORMAT” menu and in the “Arrange” section I’ll click “Rotate Right 90 degrees”. Now I’ll position the final two arrows in my shape with the help of the alignment guides. There, now it’s done!
Using the Cycle Process SmartArt (04:19)
The text on this next slide can be converted into a cycle process. I’ll mark the text, click “Convert to SmartArt” and select a simple cycle process. Whenever you want to add more text to your SmartArt graphics you can do so by typing in the text box. Here I’ll add one more step in the process by adding “Change”.

I’ll change the order of the steps by clicking “Move up”. I can also change the direction of the arrows by clicking “Right to Left”. Again, I’ll go to the “DESIGN” gallery and select a nice finishing.
Using Hierarchies (04:56)
This next slide is just filled with a lot of text. I’m going to turn this into a hierarchy and this is one of my absolute favorites. I’ll mark the text, right-click and select “Convert to SmartArt”. Here I’ll click “More SmartArt Graphics”. Here you can see all the SmartArt graphics grouped into various categories. I’ll go to the “Hierarchy” category and select the “Half Circle Organization Chart” and click “OK”.

And there we go! Now isn’t that great! Can you imagine how long it would take me to do that by hand?!

Inserting SmartArt from scratch (05:32)
Up until now I’ve only showed you how to convert text into SmartArt. Before I end, I want to show you how you start from scratch so I’ll delete the text on this slide. To insert SmartArt from scratch either click the “SmartArt” icon on the slide or go to the “INSERT” tab and click “SmartArt”.

Here I’ll select a “Relationship” graphic with two counterbalance arrows and click “OK”. Now I’ll enter my text in the text box. This SmartArt graphic can only take two lines of text. If I try to add a third, you’ll see a red cross indicating that it will not be visible in the SmartArt graphic.

So I’ll just delete the third row. As a final touch I’ll add a 3D design to the graphic and resize it by dragging the right corner while holding down the left mouse button. Now I’ll center the SmartArt by going to the “HOME” tab, click “Arrange” “Align” and then “Align Center”.
There now let’s have a look at the final result. In just a few minutes, I’ve created eye-catching slides using SmartArt graphics in PowerPoint 2013.