Create an attractive article using styles
Learn how to effectively use styles in Microsoft Word 2010 to write great looking documents
Introduction (00:04)
Welcome to Business Productivity – I’m Ulrika Hedlund. In order to attract your readers and to provide them with a great reading experience it’s important that you as a writer think about the layout and the design of your article – as well as the content. There are a number of tools in Microsoft Word 2010 that can help you design your documents. In this video I will show you how you can create an eye-catching article using Word 2010. I’ll show you how to format your text in multiple columns, how you can insert and edit images and finally how you can create your own style sets.
Using templates or starting from scratch (00:45)
In order to get some inspiration for my article I’m going to look at some of the available templates. I’ll go to the File tab and click “New”. Here I can browse through the various category templates or I can search. I’ll type “article” in the search box and here I can see a number of different templates. If I want to use one of them I can just click the Download button or double-click the template. In this case I want to show you how I can create an article from scratch so I’ll click “Home” and then double-click the Blank Document option. The article that I want to create on Running Effective Meetings will look like this when it’s done. [Show article]
Applying built in styles (01:31)
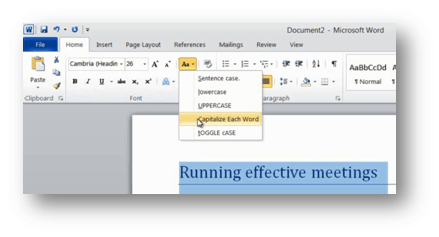
I’ll start my article by writing the title, “Running effective meetings”. I’ll mark the title and click on the “Title” style to tell Word that this is the title. I’m not thrilled about the blue formatting and the font used for the title, but I’m going to leave it for now and change the look and feel when I’ve finished writing all the text in the document. To make the words in the title stand out more I want to capitalize the first letter of each word. Having the title marked I’ll click the “Change Case” button and select “Capitalize Each Word”.
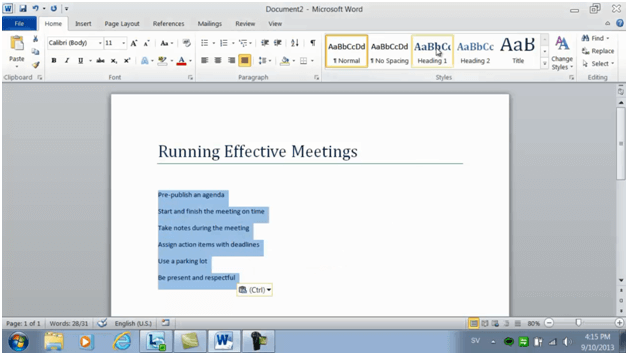
Next I’ll write the outline for the article, to place the cursor I’ll just double-click in the position where I want to start writing. The outline will also work as the headings for each paragraph. I’ll mark the headings and apply the “Heading 1” style.
Again, I’m not going to make any changes to the formatting of the style right now. When I’ve finished the contents of my article I’ll write the introduction text. I want the introduction text to stand out from the rest so I’ll mark it and apply the “Emphasis” style. Now that I’m done with the content of the article I’m going to work on the formatting and layout.
Changing the style (02:58)
To make it easier Word has a number of built in Style Sets that I can use. A Style Set is a combination of fonts, colors and layouts that work well together.
Since I have applied styles to the text in my document I can apply these different Style Sets to see if I find one I like. If I’m happy with a Style Set and I only want to change the color theme I can select “Colors”. Similarly, if I want to try out different fonts I can change the “Fonts”.
If you don’t like any of the available Style Sets you can create your own. To do that, I’ll start with the title. I’ll mark the title and first I’ll change the font. I get a live preview of the different fonts so that I can see what it will look like before I select it. I’ll change the color of the title to black and center the title by clicking the “Center” button in the Paragraph section. I’ll also remove the bottom border by clicking “No Border”. Now that I’m happy with the formatting I’ll right-click the Title style and click “Update Title to Match Selection”. This way my changes are saved to the “Title” style.
Making numbered headings (04:18)
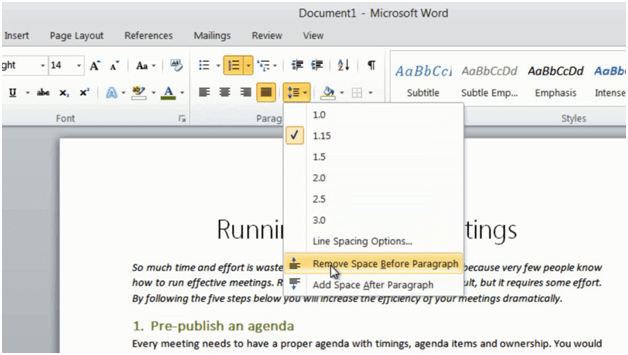
Now for the headings. I want these headings to be numbered so I’ll mark the first heading and click on “Numbers” in the bulleted list, here I can select a number of different numbering formats. I’ll just select the default numbering. Word automatically indents lists, but since I want this to be a heading I’ll undo the indent by clicking the “Decrease Indent” button. I’ll scroll down the font list and select a new font for my “Heading 1” style, I’ll also change the color to Olive Green. As you can see there is quite a lot of space between my paragraphs. I want the article to be a bit more compressed so I want to remove the space before the headings. To do that I’ll go to the “Paragraph” section and on the “Line and Paragraph Spacing” button I’ll click to “Remove Space Before Paragraph”.
To apply this change to all the headings I’ll right-click the Heading 1 style and click “Update Heading 1 to Match Selection”.
Changing the margins (05:24)
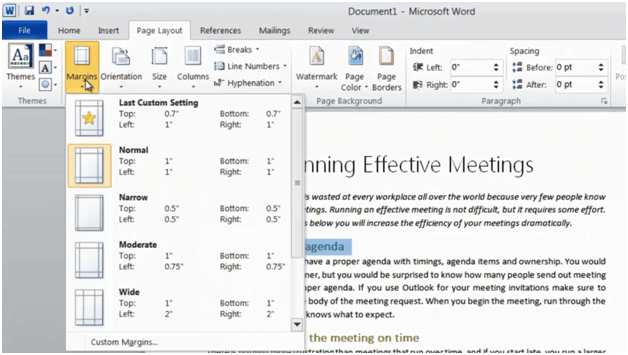
Now I want to remove some space on the sides by making the margins smaller. To do that I’ll go to the “Page Layout” tab and click “Margins”. Here I can select between a number of pre-defined margin settings, I’ll select the “Narrow” margins.
Arrange the text in two columns (05:41)
Now I want to change the layout so that the six paragraphs are in two columns. To do that I’ll mark the text, and on the “Page Layout” tab I’ll click “Columns” and select “Two” columns. My text is now organized into two columns, making it more like a magazine article.
Insert a hyperlink (06:03)
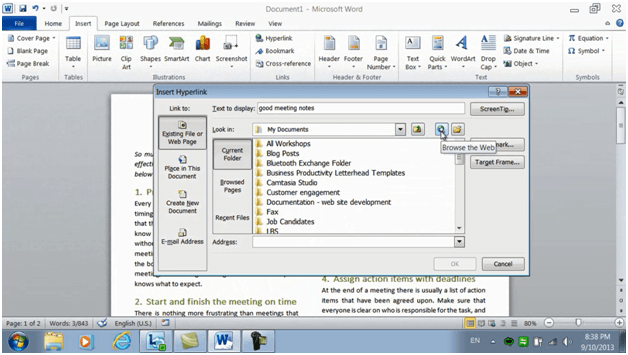
Now I want to insert a hyperlink in my text. I’ll mark the text I want to add the hyperlink to, go to the “Insert” tab, and in the “Links” section I’ll click “Hyperlink”, I can also use the keyboard shortcut CTRL + K. I’ll click “Browse” to look for the web page I want to link to.
Here I’ll type “how to take good meeting minutes” and open up the web page from my blog on how to take good meeting minutes that I want to reference. I’ll go back to the Insert Hyperlink dialog box and click “OK” to insert the link.
Working with images (06:46)
Now I want to add some pictures to make the article more appealing to the eye. I’ll place the cursor where I want to position the picture and on the “Insert” tab I’ll click “Picture”, here I’ll select the image I have of an agenda. When I have an image marked the picture tools appear, here I have a number of options to edit the image, but in this case I’m happy with the image and the placement of it. Next I want to insert another image at the top of the article. I’ll move the title down a bit by just hitting Enter a few times and then I’ll go to the “Insert” tab again and in the “Illustrations” section I’ll click “ClipArt”. I’ll search for an image for “meeting”. I like this one, so I’ll click “Insert” to put it into my document. I’ll close down the ClipArt panel and zoom out a bit by clicking the minus sign on the zoom slider. I want this image to be positioned at the very top of the page, covering the margins. To do that I’ll click “Wrap Text” and select to place the image “Behind Text”.
Now I can freely move the image as I want on the page. I’ll resize it so that it covers the full length by pulling the bottom right corner while I hold down the Shift key. This way the image keeps its proportions. I’ll click “Crop” and then I’ll crop the picture from the top and then the bottom. Now I’ll move it to the right position. As you can see it’s still a bit too large, so I’ll double-click the image again and crop some more. There that is perfect!
Distribute columns evenly (08:29)
The final touch is to even out the text on the second page to balance the article. I’ll place my marker in front of the last paragraph, click “Page Layout”, “Breaks” and then insert a “Column break”. Now the last paragraph will start in the second column.
Saving the Style Set (08:50)
Now I’m done with my article! I’ll click “Save” or press the keyboard shortcut CTRL+S to save the final changes to my article. In addition to saving my article I also want to save this Style Set. That way I can use the same look and feel for future articles without having to change the fonts all over again. To save the Style Set I’ll click “Change Styles”, “Style Set” and then “Save as Quick Style Set”. I’ll give it a name, “Article” and now when I go to the “Style Set” gallery, my newly created style set for my articles with be there as an available option.
Closing (09:31)
By using the built in themes in Word 2010 you can get a head start and get some great inspiration, but to really create an eye-catching article you need to know how to create your own styles. I’m Ulrika Hedlund with Business Productivity. Thanks for watching!


