Getting started with social in Office 365 – an End-User Guide
Last week I wrote a blog article about Enterprise Social Networks by Microsoft, including SharePoint and newly acquired Yammer. Enterprise social networking can have an enormous impact on the knowledge sharing within your organization. If done well it can, among other things, lead to an increased sense of organizational identity, improved transparency, decentralization of information and improved communication. This all sounds good, but how do you get started? In this week’s blog article I’ll share 5 steps for you to get going with social networking in SharePoint in Office 365 as an end user.
1. Fill out your profile
One of the most important steps to get started with social networking within your organization is to share information about yourself in your profile. This includes sharing skills you might have, projects you have worked on and interests that might (or might not) be relevant to your job. You should also add a profile picture that is suitable for your work environment. To edit your profile in Office 365 (using SharePoint 2013) click your name in the upper right corner and click “About me”, then click “edit”.
Here you can add basic information such as a personal description and things people can ask you about. You can also add contact information and details such as which schools you attended and your interests.
2. Review your Newsfeed settings
In order to be comfortable sharing information, you need to understand what gets shared and how. You also need to understand how email notifications work. By default, you will get email notifications about everything – people who start following you, if someone replies a comment to a post or if someone clicks that they like your posts. Getting an email every time these activities occur can be quite annoying, so I recommend you change the email notifications so that they suit your work style (unfortunately I haven’t found a way to get a weekly digest of all newsfeed activities). If you check your newsfeed often you can remove most of the email notifications, but if you don’t look here very often then you better keep email notifications so that you don’t miss out on things that might be of interest.
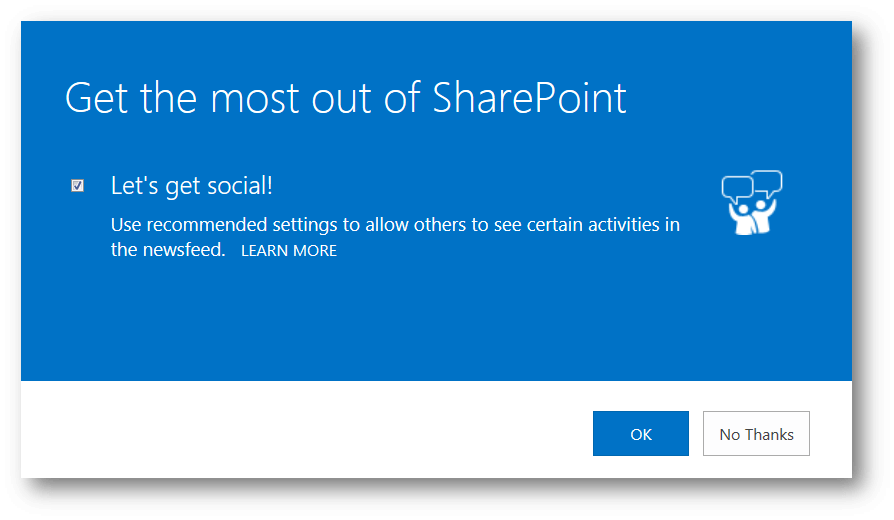
 If you agree to the recommended settings in the “Get the most out of SharePoint” pop up, a number of activities will be posted on your newsfeed. This includes when you follow a person, document or site, when you tag or like something, when you have your birthday celebration (if you have added this to your profile), and so on. If you click “No Thanks” in this pop-up, none of your activities will be shared on your newsfeed.
To change the Newsfeed settings click the ellipsis (three dots) to the right of the menu and select “Newsfeed Settings”.
Here you can select which events you want to be notified about and which activities you want to share in your newsfeed. In general, I recommend that you share as much as you feel comfortable sharing.
3. Follow people, sites and documents of interest
Next, you want to add people to follow. To follow someone means that you will see their activities when you go to the “Newsfeed” page. Here you should add people whose activities are of interest to you in your role. This might include peers that have similar job activities as you that you can learn from, product experts who work on the same products as you whose work is of interest, your boss to better understand how he or she is investing his or her time and perhaps the General Manager to get a deeper insight of activities related to  running the business. If you follow someone the person will receive an email notification ( if they haven’t changed the default settings). So you can’t follow someone “in secret”. Even though it’s seen as “good manners” to follow people back who are following you, you shouldn’t feel obliged to do so.
To get started following people, on the Newsfeed page click “Following” in the menu and then click “Follow” to open up a window where you can add multiple names.
This is a good way to start if you want to add multiple people at once. Whenever you want to add an additional person to follow just click on their name (wherever it is visible in SharePoint) and then click on “Follow” or click on the star icon next to their name. You can just as easily “unfollow” a person. The person will not get an email notification that you have stopped following them, they will, however, see that you are no longer listed under the list called “My followers”.
4. Share what you are working on
If you’ve never shared anything before you might want to look at what other people you are following are posting – and how they are posting. Common things to post when it comes to enterprise social networking is projects you are working on, customer deals you are engaged in, business trips you might be on, problems you are facing, and so on. In SharePoint you can use standard online microblogging capabilities such as mentioning someone using an @ symbol (that person will get a notification email if they haven’t changed the default settings), “liking” a comment will publicly show others your appreciation (it will also show the post on your own newsfeed for those who are following you), adding a hashtag # symbol with a keyword helps organize information into certain topics which is beneficial when searching for information related to that topic or if you want to “follow” that topic/tag.
5. Download the mobile app
 To stay up to date and to engage in the enterprise social networking even when you are away from your computer you can download the SharePoint Newsfeed mobile app. It’s currently available for Windows Phones and iPhones, this summer there will be a Windows 8 app as well. To get started with the app, just search for it on your device app store/marketplace and install it on your device. The first time you sign in you need to enter your SharePoint personal site URL, for instance: https://companyname-my.sharepoint.com, after that you sign in using your normal Office 365 username and password.
With the SharePoint Newsfeed mobile app, you can easily post pictures you have taken with your phone camera, write comments and stay up to date with the latest conversations in your organization.
Make sure you have proper policies in place before you start
Social networking in an organization should be properly planned and there should be guidelines and metrics in place for measuring the outcome. Even though many users are used to social networks like Facebook and Twitter you shouldn’t underestimate the need for training and guidance. Please feel free to share this getting started guide, but be sure to have your company social networking objectives and policies in place before you do.
(If you have difficulties reading this article, you can access the full article in pdf here)


