Manage your contacts effectively
Introduction (00:04)
Having updated contact information to the people you want to communicate with is the first step. Next you need to learn how to use this contact information effectively. In this video you will learn how to quickly find contact information you are looking for, you will learn how to communicate with multiple people at once and you’ll learn how to arrange your contacts using categories and views.
Understanding contact folders (00:29)
Your contacts are organized in a number of different contact folders. The first one is the main folder, typically this is the one that is synchronized to your mobile phone if you have mobile access to your contacts.
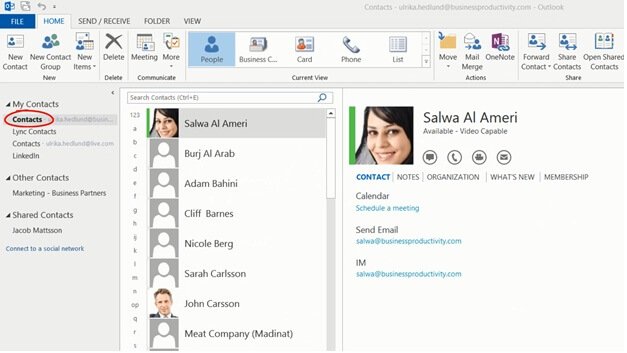
In addition I have a contact folder associated with my Lync account, one folder with my private Windows Live contacts and one with my LinkedIn contacts. I also have SharePoint contact lists and contact folders colleagues have shared with me.
You can easily create your own contact folder. This might be useful if you want to separate a group of contacts for an event or an email distribution. To create a new contact folder just right-click in the “My Contacts” group and select “New folder”. Here I’ll create a folder called “Networking” where I will add contact details of people I meet at networking events.
Configuring the Address Book (01:21)
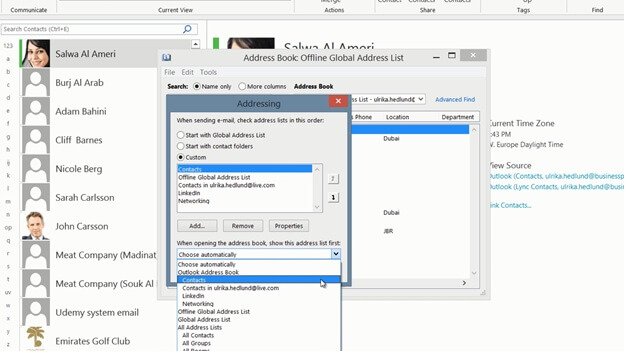
When you compose a new email and press the “To” button, the Address Book opens up. The Address Book is a collection of all your different contact directories. If you work in a large organization and most of your email communication is done internally I recommend you keep the offline Global Address List as your default contact directory in the Address Book. However, if you like me, work in a smaller organization and most of your communication is done with contacts in your contacts folder you should change the default settings. To change the settings of the Address Book, go back to your contacts folder and click the “Address Book” then click “Tools” and “Options”.

The first option is to decide which contact source to check when sending email. Here I’ll select “Custom” and then I’ll rearrange the order so that my Contacts folder is used first. I’ll also select to show my contacts folder when opening up the Address book.
I’ll click “OK” to apply the changes. Now when I want to send a new email and press “To” my contacts are visible in the Address Book.
Searching for contacts (02:34)
The most effective way to find a contact is simply to do a search. Click in the “Search Contacts” field and type in who you are looking for.
Here I’ll type “Nancy” and immediately I get the result of Nancy Roberts. I can also search for her by last name. The instant search is very powerful, but it has some limitations. Say that I want to search for Catherine, but I don’t know if she spells her name with a K or a C. If I just type in “atherine”, Outlook won’t find anything. I have to type in the beginning of the name to find the contact, so I’ll just have to try both letters, first I’ll try a “C”, nothing, and then with a “K”, and there Outlook found the contact.
I don’t have to limit my search to names, I can search for any field in the contact card. If I search for “170” I get the result of our Emirates Golf card, if I open up the Notes section you can see that I have our membership number there starting with “170”.
Using advanced search (03:40)
Whenever you click in the search field the “SEARCH TOOLS” appear. Here you can do more advanced searches. I want to send out an email invitation to an executive round-table to the CEOs in my network. To find all contacts that are CEOs I’ll click “More” and select “Job Title” and type in “CEO”.
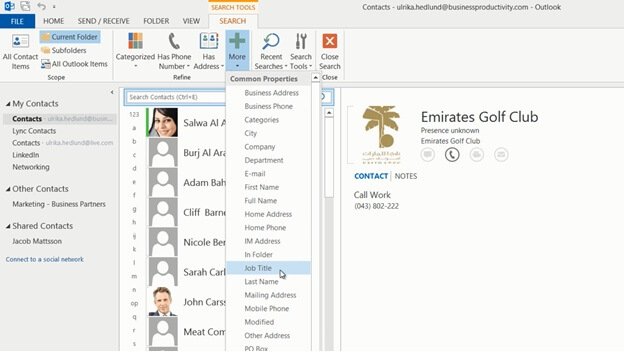
To get a better overview of all the contacts I’ll click the “Business Card” view. Here I’ll select all contacts by marking one and then pressing CTRL + A on my keyboard. To send an email to all of them I’ll click “Email”. Since I don’t want them to see each other’s email addresses, I’ll click “To” and move the email addresses to the BCC field instead. Now I can send them the invitation to our executive roundtable event.
Changing search settings (04:32)
Now I want to send an email to Susanna asking her if she wants to partner with us for the Executive roundtable. I’ll do a search for “Susanna”, but Outlook doesn’t find anything, but I know I have her contact details somewhere. By default Outlook only searches your current folder, that is, your primary contact folder. If you want Outlook to search all contact folders you can extend the search by clicking “All Contact Items”.
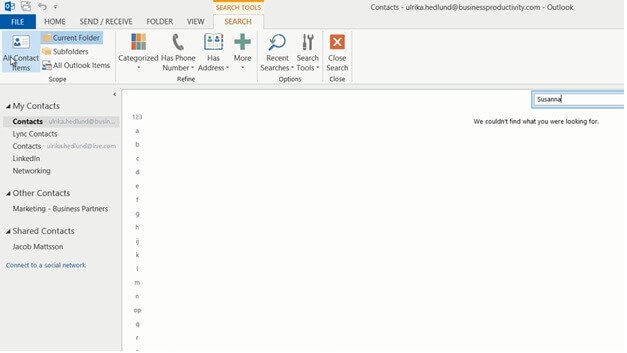
Now Outlook found the contact card which was located in my “SharePoint Business Partner contact list. I’ll send her an email by clicking the little Email icon in the contact card and ask her if she wants to partner for the executive roundtable.
If Outlook doesn’t find what you are looking for the indexing might be incomplete. To check the status of the indexing, click “Search Tools” and then “Indexing status”. Here you will see if Outlook has more items to index.
I want to have all the contacts I have in my SharePoint contact list to be available in my primary contact folder as well, so I’ll mark all of the contacts by pressing CTRL + A and then I’ll drag and drop them to my primary contact folder. Now if I go back to my primary contact folder I can see that Susanna is available there.
Organizing contacts using Categories (05:52)
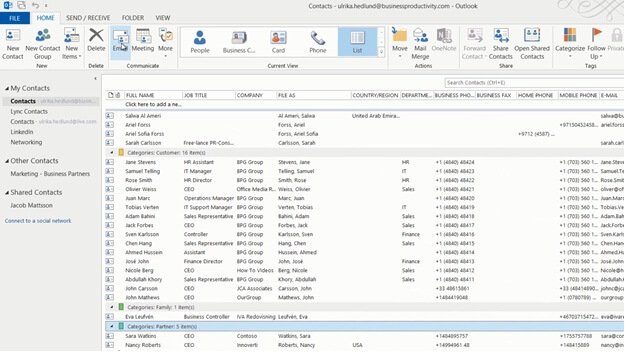
A great way to organize your contacts is to use “Categories”. If I have contacts marked with categories I can view them as groups. I’ll click the “List” view to get a better overview of my contacts. I’ll right-click any heading and select, “Arrange By”, “Categories”.
Here I can see the various categories my contacts have been organized in. I’d like to mark Susanna with a category called Partners. To mark a contact with a category mark the contact and click “Categorize” and select the category. Categories are the same between your email, your contacts and your tasks. To create a new category click “All Categories” and then “New”. Here I’ll create a new category called “Partner”. I’ll click “OK” and “OK” again and now I can see that Susanna has been grouped into the Partner category.
Updating multiple contacts at once (06:51)
Now I’d like to add some more contacts to the Partner category. To apply a property to multiple contacts at once, I’ll mark the contacts by holding down the CTRL key. I’ll mark my contacts and then I’ll scroll down to the Partner category group and drag and drop my marked contacts there. Immediately the Partner category is applied. You can do this for any type of property you want to apply, just group by the property and then drag and drop your contacts to the group.
Now that I have my contacts organized into categories I can easily engage with them. To send an email to the entire Partner category at once, I’ll mark the category heading, click “Email” and then compose my email.
Creating a Contact Group (07:40)
If you frequently send email to a group of recipients it might be useful to create a Contact Group. To create a new Contact Group click “New Contact Group” and then give your Contact Group a name.
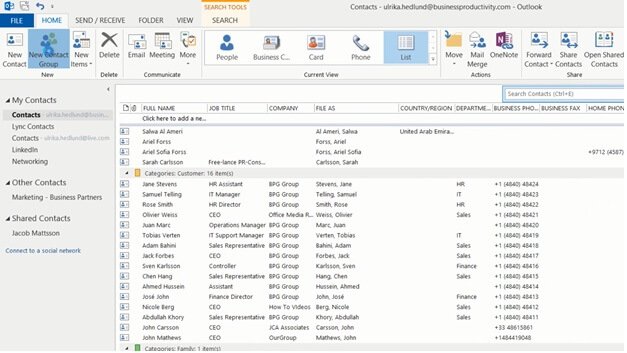
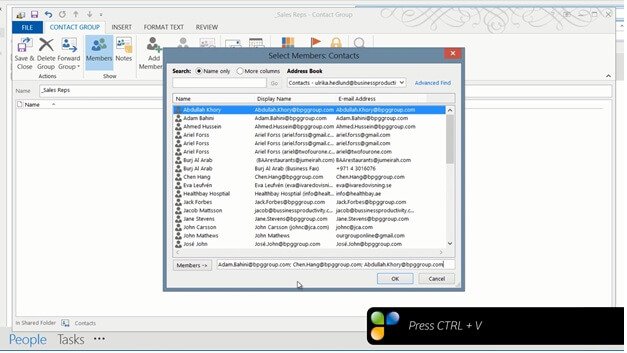
I usually start the name with an underscore [_] so that it’s easy to find. I’ll name this “_Sales Reps” and then I’ll add members by clicking “Add Members”. I’ll select to add members from my Outlook Contacts. I want to select our sales representatives but unfortunately the search capabilities are very limited here so I have to add them one by one. Another way to add members to a contact group is to first search for the contacts in your contacts folder. I’ll do a search for “Sales Representatives” [sales rep], and here I have all of the contacts I want to add to my Contact Group. I’ll select all contacts by pressing CTRL + A, and then I’ll open up an email and copy the email addresses.
I’ll close down the email and then I’ll create my Contact Group. I’ll name it and then click “Add Members” “From Outlook Contacts” and here I’ll just paste in all of the email addresses and click “OK” and then “Save & Close” group.
Now if I want to send an email to the group, I open up a new email, type underscore and select my newly created Sales Rep group. A lot quicker than adding people one by one.
There are some limitations in using Contact Groups. One is that if you change the email address of a contact the Contact Group won’t automatically be updated. So if you know that the email addresses of the people in the group change frequently, it’s better to use Categories.
By knowing how to effectively manage your contacts using Outlook, you will save time and be more in control of your valuable contact directory.


