How to use Outlook 2013 with social networks?
In previous versions of Outlook, you could download and install a social connector add-in to connect Outlook to various social networks such as LinkedIn and Facebook. In Outlook 2013 this capability is built into Outlook, all you have to do is to activate the connections. In this week’s blog post I’ll share with you how to effectively use Outlook 2013 with your social networks.
1. Connect Outlook to your social networks of choice
To connect Outlook 2013 to a social network, go to the “People” view and click “Connect to a social network”. A dialog box will open up where you can select to connect to a number of different networks including SharePoint, LinkedIn and Facebook. You need to enter your login credentials to the various networks you want to connect to.
Outlook merely displays a subset of the information you have access to through the social network websites, you will never see information you don’t have permissions to see.
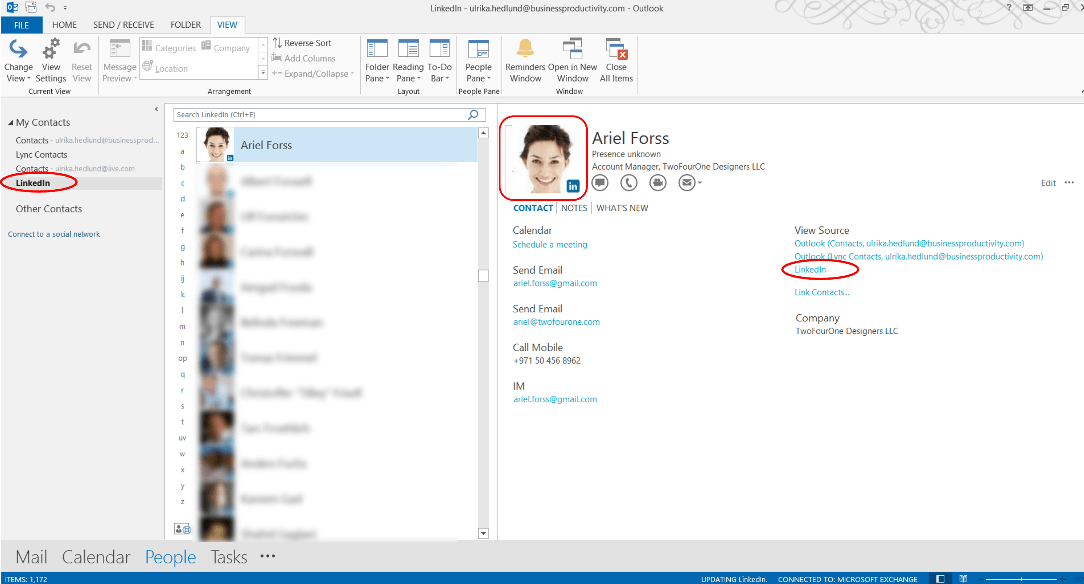
When you connect to LinkedIn a new contact folder called “LinkedIn” is created in Outlook 2013 containing all your LinkedIn contacts. Here you can see their profile picture, email address and other information they have on their LinkedIn account. This information can be accessed even when you are offline.
Facebook and SharePoint information are not saved by Outlook, so you need to be online to access any information from these networks.
2. The “People View” combines contact details from various sources
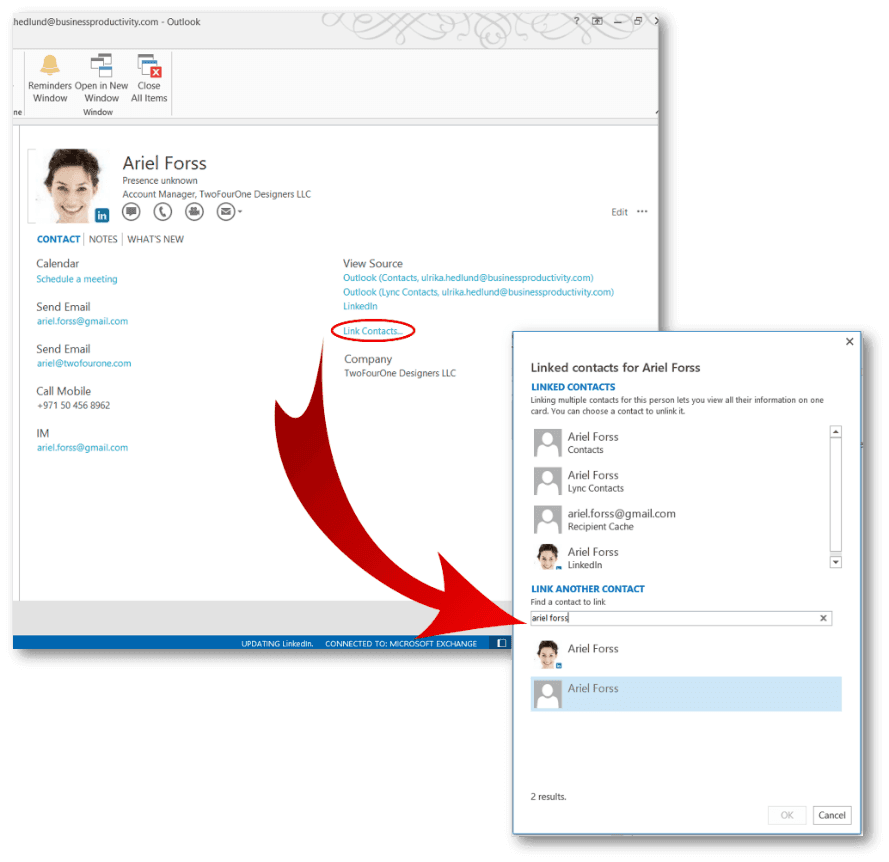
 The “People” view in Outlook 2013 combines information from your “normal” contacts folder, your LinkedIn folder and any other folder or online sources (such as SharePoint and facebook). Outlook checks to see if any of the entered email addresses are the same across these sources, if they are, Outlook combines all contact information from these sources in one single view. You can link contacts yourself. To link contacts, go to the “People View” and look up the person’s people contact card. Under Sources click “Link contacts”. Search for the name of the person you want to link to and select it. The information will then be aggregated in one single view.
3. Decide if you want to see Facebook or LinkedIn profile pictures
By default, Outlook shows profile pictures saved in the contact card. If the contact card doesn’t contain a picture, Outlook will display the profile picture from one of the social networks you are connected to.  If you are connected to multiple social networks there are numerous profile pictures that can be displayed. You can decide yourself which profile picture you want to show by default. As a business professional, I prefer to show the profile pictures from LinkedIn, since these tend to be more professional. To make the LinkedIn profile picture the default profile picture in Outlook, go to the People view and click “Connect to social networks,” next to LinkedIn click the edit icon to open up the Settings dialog box. Click “Options” and then select the third checkbox which says “By default, show photos and information from this network when available”.
You will still be able to see information from Facebook and other social networks, but the default profile picture that will be shown will be from LinkedIn.
4. View information from your social networks in Outlook 2013
 Information from the social networks is visible in a number of ways. If you look at the People contact card you will see the profile picture, title, email addresses, phone numbers, and addresses, in a combined view from the various social networks and contact folders. To see post updates from the various networks click “What’s New”.
If you get an email from someone and the email matches an email address of one of the people in your network you will see the profile picture of the person directly in the email. You can access updates from the person’s social networks in the People Pane in the email. To turn this on click “View”, “People Pane” and then “Normal”. This way you can see the updates from the person directly in the email they sent you.
5. Keep your own contact information up to date
Since people you are connected to on LinkedIn and Facebook will have your contact details updated in Outlook it’s best you keep this information up to date. By nature, LinkedIn is more job-focused so here I recommend that you enter your business email and phone number. Your Facebook account is usually more for friends and family so here you might want to put your personal email address and phone number.
To edit your contact information in LinkedIn click Profile – Edit Profile and then click on the little pen icon next to email and phone number.
To edit your contact details in Facebook, click your home page and then “Update Info” and update the details under the “Contact details” section.
Make the most of the information accessible to you
Many customers I meet are reluctant to enable their employees to connect Outlook to social networks because they believe they will be less productive. Personally, I always recommend customers to enable it, because I believe the advantages outweigh the downsides. Keeping up to date, and staying better informed of what’s going on around you is a key advantage in today’s world where communication is so critical.
(If you have difficulties reading this article, you can access the full article in pdf here).


