Plan an event using delegated team tasks
Learn how to use task libraries in Office 365 to plan your events
Introduction (00:03)
Welcome to Business Productivity – I’m Ulrika Hedlund. Whenever you need to plan an event there are countless tasks that need to be coordinated. As a project owner it’s often difficult to keep track of things, and as a team member you often waste time trying to figure out what other members in your team have done.
In this video I’ll share with you how you can create a task list using SharePoint in Office 365 to plan an event by delegating tasks to your team members. I’ll show you how you can customize tasks to show detailed information, I’ll also show you how you can create your own views to get a better overview of the status of your project, and finally I’ll show you how you can connect your task list to Outlook for easy access. Let me show you!
Create a new task list (00:52)
So here I have the marketing team’s workspace. To create a new task list I’ll just click “Site Actions”, “More Options” and search for “Task”. The project task list allows you to work with Microsoft Project as a scheduling tool, but in this case we just want to have a simple SharePoint task list. [Click “Tasks”]. And I’ll name this “Launch event tasks” and click “Create”.
Create a new task (01:24)
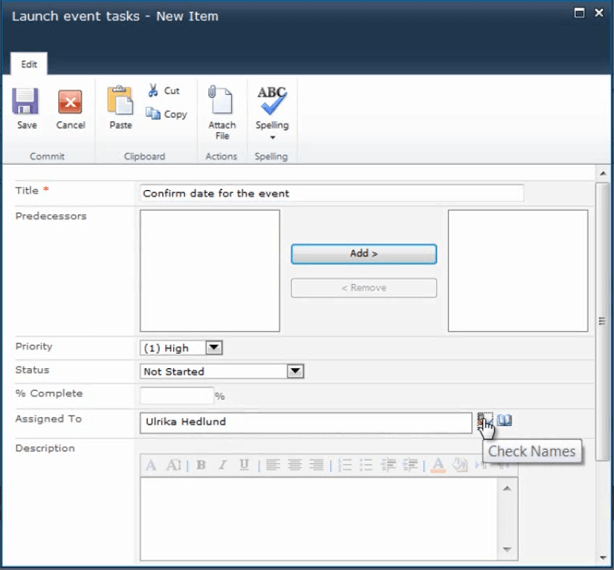
Now I have a task list with title of the task, who it’s assigned to, the status priority, etc. To create a new task, I’ll just click “Add New Item”, and I’ll type in the information. “Confirm date for the event”.
Here I can select if we have any tasks that need to be completed before I can do this task. But in this case this is empty and this is the first thing that we need to do. I’m going to put high priority and I’m going to assign this to myself. So, I’ll just write my name and click on the “Check Names” box.
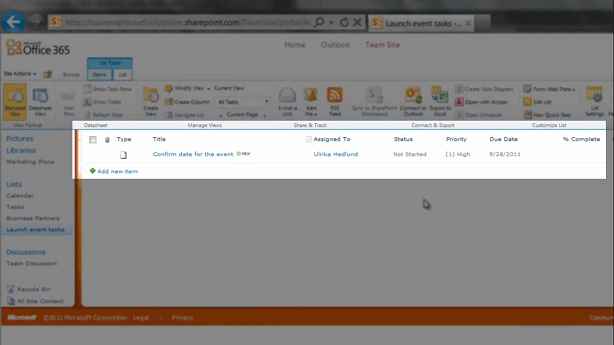
And then I’ll write a short description; “decide on a date for the event”. I can select a “Start date”, which is today, and I’ll also decide a “Due date” and for this, this needs to be done within two days. And then I’ll click “Save”. And there we can see the task, that it’s been assigned to me and the status of this task.
Delegate tasks to your team members (02:18)
Now I want delegate some tasks to the members in my team. If I want to add multiple tasks instead of clicking “Add New Item” I can click “Datasheet View” and my task list looks just like an Excel spread sheet.
So here, I’ll add a task to “Book venue” I’ll assign this to Jacob in my team, I’ll put a due date and I’ll pick a task that has to be completed before we can book the venue. And I’ll click “OK”.
Get alerts when tasks have been updated (02:55)
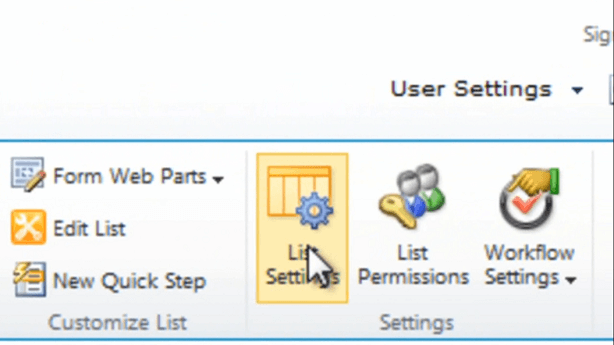
Now if Jacob looks at this page he will see that he has a task assigned to him. But I want to make sure that whenever I assign a task to someone in my team that they get an email notification. So to do that, I’ll go to the “List Settings”.
And choose “Advanced settings”. Here I can choose “E-Mail Notification”. So as soon as an ownership is assigned an email will be sent. And then I’ll click “OK”.
So now, if I create a new task and I assign it to someone that person, or that group, will get an email notification. Now, I can also choose to get an alert.
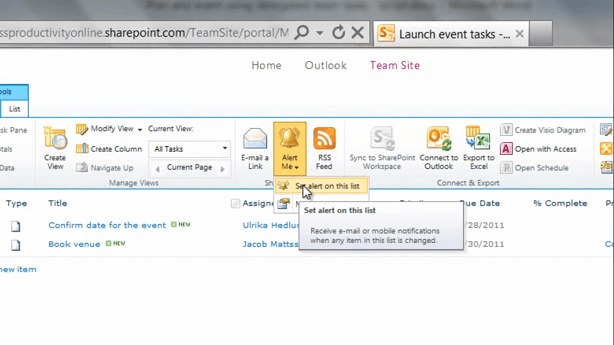
So here I can choose to get an email alert. I can choose to get an alert if something new is added or if something is modified or deleted. And I can also set exact details on what I want. The one thing that I am missing here is that I would like to get a notification if a task hasn’t been completed on the due date. You can implement this using the work flow settings, but in my opinion it should have been included here by default. And here I can choose to get a weekly summary. And I’ll just click “OK”.
If I want to change these email notification settings I can just click “Alert Me”, “Manage My Alerts” and I can click on the alert to change the settings.
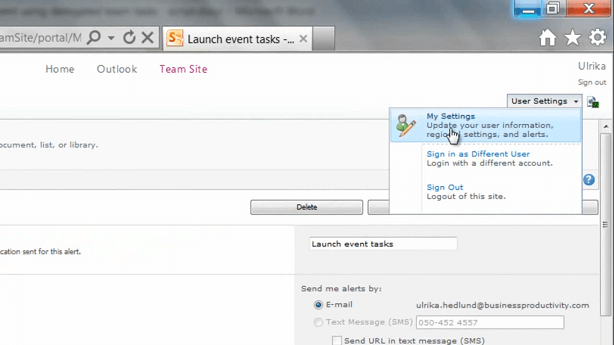
In order to get these email alerts you need to make sure you have your profile information set up correctly. If you need to change this, you could go to “User Settings”, “My Settings”.
And update the information here. And I’ll just return to our list clicking on the link in the quick launch bar.
Add more detailed information to your task list (04:46)
Okay, so let’s go back to the first task. Here we have “Confirm date for the event”. So say that I’ve now done my research and I’ve decided on a date for the event. What I would like to do is add a column for “Outcome” or “Decision made”. So to do that I’ll go to the “List Tools” and then choose “Create Column”.
And here I’ll name it “Decision made/Outcome” and I’ll make this “multiple lines of text” and click “OK”. Now we have our new column, so if I click on the task and choose edit, I can now change this to [status] “Completed”, a 100 % completed, and I’ll put the outcome here:
“October 6th”. And click “Save”. Now I can easily see the tasks and outcomes in one single view.
Create a graphical status overview of your project (05:42)
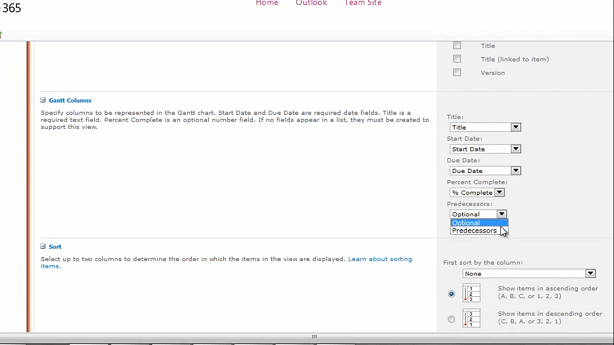
What I would like to do is to create a new view where I can get a graphical overview of our tasks. To do that I’ll click “Create View” and here I’ll choose a “Gant View”. I’ll just name this “Gant view” and here I’ll uncheck some of the fields that I’m not interested in seeing. Here I have a section called “Gant Columns”:
So these are the columns that will be used for the graphical view. So we’ll choose a title, which is the “Title” column. We’ll choose a Start date, the due date, percent complete and predecessors.
And then we’ll click “OK”.
And here is my Gant view; this gives me a great visual representation of the status of our project. The tasks that have been completed have a grey bar running through the task and I can see the dependencies between the different tasks with this blue arrow.
To switch between the different views I can just click on the name of the view and select the one I want to see.
Connect your task list to Outlook (06:58)
Now the final thing I want to show you is how you can connect this task list to Outlook. In that way you can use Outlook to update your tasks. To do that, click the “List Tools” again and choose “Connect to Outlook”. Click “Allow”. [Click] “Yes”. And now I have all of my tasks in Outlook.
I can easily add a new task, assign it to someone and put a start date and an end date. Now if I go back to our team site and [click] “Refresh” you can see that I have the new task there.
Closing (07:39)
If your team is not used to being assigned tasks in this way, they might be a bit hesitant in the beginning. I recommend that you sit down with your team and you tell them about the benefits you would all gain from coordinating tasks this way. After a while I’m sure they will all see the benefits.
I’m Ulrika Hedlund for Business Productivity – thanks for watching!


